


NoMachine Free Edition - Installation and Configuration Guide
Table of Contents
Introduction
1. NoMachine Free Edition - Installation and Configuration Guide
How to set-up NoMachine
2. Install, Update or Remove NoMachine
2.8. The NoMachine Monitor (!M) in the System Tray
Connect to NoMachine
3. Initiating a NoMachine Connection
3.1. Connect from Your Computer to a Computer with NoMachine Installed
3.2. What if the Remote Computer is a Headless Linux?
3.3. Disabling Access to the Desktop ('Desktop shared/Desktop not shared')
3.4. 'Guest Desktop Sharing' (Connect Without an Account) New!
3.5. Allowing Remote Connections Over the Internet
Configurations and optimizations
4.1. The User Interface for Server's Administration
4.2. Quick Access to Server's Administration
4.3. Personalization of User's Interface and Other Settings for Connections to Another Computer
4.4. Optimization, Device Sharing and Other Functionalities During the Remote Desktop Connection
Introduction
Welcome to the guide for NoMachine free edition v.8 or later. This guide document is intended to provide you with step-by-step instructions on how to install, update or remove the NoMachine software on your system, initiate your first connection to the remote computer and configure settings via the User Interface (UI).
1. NoMachine Free Edition - Installation and Configuration Guide
What is NoMachine for?
NoMachine, tailored for personal use, allows you to connect from your computer to the desktop of another computer with NoMachine software installed.
The double side of NoMachine, a client and a server all-in-one
A NoMachine installation provides everything that is necessary to give access to your own computer from remote (NoMachine acts as a server). It allows one connection to the physical desktop of its host.
If you need to stop temporary access to your computer from another one, click on the !M icon in the system tray and click on 'Desktop not shared'.
The same NoMachine installation can also be used to connect you to other NoMachine computers (NoMachine also acts as a client).
If you just need it to connect to a remote computer (i.e. using NoMachine as a client), you may shutdown the NoMachine services. Click on the !M icon in the system tray to open the menu and click on 'Quit NoMachine service', you will be requested if the server has to be run or not at the next reboot. This is a shortcut for shutting down the server.
Otherwise, you may consider to install the NoMachine Enterprise Client package, which is free to use and doesn't include server capabilities.
NoMachine is fully operative once installed
Once installation has been completed with success (and the computer restarted, if Windows), NoMachine is up-and-running and ready to accept connections to the physical desktop of its host machine. All the necessary services are automatically started.
Headless Linux machines
A headless computer is configured to operate without a monitor, keyboard, and mouse. In this case, or when more in general the local X server cannot be found, NoMachine will use its own display service (that is an embedded X server) to let users connect seamlessly a physical desktop running in background on the remote machine. No manual intervention or configuration is needed, but a desktop environment needs to be installed on such machine.
1.1 About this guide
This guide is organized in the following areas:
Installation
How to install NoMachine, update an exiting installation or uninstall it.
How to connect to this host
Use NoMachine to connect to another computer with NoMachine installed.
Configuration
The NoMachine user interface: a graphical interface to administer and monitor NoMachine services on this host (e.g. accept/deny connections) and configure connections to other computers.
How to set-up NoMachine
2. Install, Update or Remove NoMachine
This section will guide you through all the steps to install, update and uninstall NoMachine in your environment. Please consult the appropriate section for the operating system you are installing on. There are two ways to update your installations: via the automatic updates from our repositories or updating manually using packages.
2.1. Prerequisites
Supported Operating Systems
Windows 32-bit/64-bit Vista/7/8/8.1/10/11
Windows Server 2008/2012/2016/2019
Mac OS X Intel 64-bit 10.9 to 10.11/macOS Intel 10.12 to 12.x
Linux 32-bit and 64-bit
RHEL 6.0 to RHEL 9
CentOS 6.0 to CentOS 8.5
CentOS Stream 8 to CentOS Stream 9
SLED 11 to SLED 15
SLES 11 to SLES 15
openSUSE 11.x to openSUSE 15.x
Fedora 10 to Fedora 36
Debian 5 to Debian 11
Ubuntu 8.04 to Ubuntu 22.04
Raspberry Pi 2/3/4 ARMv6/ARMv7/ARMv8
Software requirements
A desktop environment must already be installed. This applies also to headless Linux machines.
Hardware requirements
The software is designed to work on computers with minimal HW requirements. Although the software may work with inferior CPUs or reduced RAM, for best performance NoMachine recommends you match the listed requirements.
- Intel Core2 Duo or AMD Athlon Dual-Core or equivalent
- 1 GB RAM
- Network connection (either a LAN, or Internet)
Size required on disk:
Windows 130 MB
Linux 110 MB
Mac 100 MB
ARMv6 95 MB
ARMv7 85 MB
ARMv8 105 MB
Compatibility Between Client/Server Versions
Compatibility between NoMachine v.8 and client/server v. 7/v. 6 is fully preserved. However, it's strongly suggested to upgrade both client and server side to the last available version to benefit from the new features.
2.2. Windows Installation
INSTALL
Download the package for Windows from the NoMachine web site and install it by double-clicking on the icon of the executable: a setup wizard will take you through the installation. Accept to reboot the machine, this is mandatory for completing the installation
Provide your administrative credentials if requested to authorize the installation.
Step 1: Welcome to the installer! Click on Next to start the installation.
Step 2: Read and accept the License Agreement and click Next to go on.
Step 3: Click Next to proceed and please wait while Setup completes the installation … You can then select where to install NoMachine or let the default location as it is. What's important to remember is that all successive updates will take place there. To change the place of installation you will have to uninstall the software and proceed with a fresh install.
Reboot is mandatory to complete the installation.
Step 4: Accept to reboot your machine to complete the installation and exit the Installer.
UPDATE
There are two ways to update your current installation:
- Automatic updates
You can update your installation from our repositories. Just open the NoMachine User Interface from your Programs Menu, access the 'Settings' panel and click on 'Server preferences'. Go to the 'Updates' panel and click on the 'Check now' button.
NoMachine has the automatic check for updates enabled: it will periodically check our repositories (by default every two days) to verify if updates are available. In this case, NoMachine will prompt a dialog informing that a new version is available but it will never automatically update the current installation.Checking for updates can be disabled from that dialog by selecting the 'Don't ask again for this version' option or in the Updates panel by unchecking the 'Automatically check for updates' option.
Detailed instructions for configuring the Automatic Updates are available in a separate document in the 'Configuration' section at: https://www.nomachine.com/all-documents. - Update manually with NoMachine packages
Alternatively, you may download the latest available package from the NoMachine web site and click on the executable file to launch Setup. As for the installation, Setup will guide you through all steps necessary for updating your installation.
UNINSTALL
You can uninstall NoMachine from the Windows Control Panel and the 'Program and Features' in Windows Vista, 7, 8, 10 or 11. Find the NoMachine program in the list of installed programs and choose to uninstall it.
On Windows 10 or 11, right click on Start button choose Apps and Features and scroll down to 'NoMachine'. Select it and uninstall. Otherwise open the search box, type 'Control panel' to open it. Then go to Programs, Programs and Features and uninstall NoMachine from there.
On Windows 8 you can use the Search box from the Charms bar on the right side of the screen: type Control Panel to open it. Then access the Programs - 'Uninstall a program' panel.
On Windows 7 and Vista, click on the Start button and click to open the Control panel from the Start menu. Then access panel 'Programs and Features' .
Reboot is mandatory to complete the installation.
2.3. Mac Installations
INSTALL
Download the DMG package from the NoMachine web site and double click on the package icon to mount the disk image. Next double-click on the package to install it; the Installer will take you through the installation.
Step 1: Welcome to the installer! Click on Continue to start the installation.
Step 2: Read the License Agreement and Agree. Then click on Continue to proceed.
Step 3: Provide administrative credentials and confirm by clicking on Install Software. Then click on Install and wait until Installer completes.
Step 4: The installation phase is now complete, click on Close to exit Installer.
UPDATE
There are two ways to update your current installation:
- Automatic updates
You can update your installation from our repositories. Just open the NoMachine User Interface from Applications, access the 'Settings' panel and click on 'Server preferences'. Go to the 'Updates' panel and click on the 'Check now' button.
NoMachine has the automatic check for updates enabled: it will periodically check our repositories (by default every two days) to verify if updates are available. In this case, NoMachine will prompt a dialog informing that a new version is available but it will never automatically update the current installation.Checking for updates can be disabled from that dialog by selecting the 'Don't ask again for this version' option or in the Updates panel by unchecking the 'Automatically check for updates' option.
Detailed instructions for configuring the Automatic Updates are available in a separate document in the 'Configuration' section at: https://www.nomachine.com/all-documents. - Update manually with NoMachine packages
Alternatively, you may download the latest available package from the NoMachine web site and click on the executable file to launch Setup. As for the installation, Setup will guide you through all steps necessary for updating your installation.
UNINSTALL
To uninstall, just drag and drop NoMachine from Applications to trash or select 'Move to trash' from the mouse button menu. Administrative credentials are requested.
2.4. Linux Installations
Installing for the first time
You can install, update and uninstall using the graphical package manager of your Linux distribution or from command line by running commands from an xterm or similar with the sudo utility, or as root user if you don't have sudo installed. Instructions below refer to installation by command line .
Successive updates
The update procedure for server and node installations requires to stop all NoMachine services in order to correctly replace libraries and binaries. This implies that all running sessions are terminated during the update procedure and cannot be recovered later. This applies to upates made by using NoMachine packages and to automatic updates from NoMachine repositories.
There are two ways to update your current installation:
- Automatic updates
You can update your installation from our repositories. Just open the NoMachine User Interface from your Programs Menu, access the 'Settings' panel and click on 'Server preferences'. Go to the 'Updates' panel and click on the 'Check now' button.
NoMachine has the automatic check for updates enabled: it will periodically check our repositories (by default every two days) to verify if updates are available. In this case, NoMachine will prompt a dialog informing that a new version is available but it will never automatically update the current installation.Checking for updates can be disabled from that dialog by selecting the 'Don't ask again for this version' option or in the Updates panel by unchecking the 'Automatically check for updates' option.
Detailed instructions for configuring the Automatic Updates are available in a separate document in the 'Configuration' section at: https://www.nomachine.com/all-documents. - Update manually with NoMachine packages
Alternatively, you may download the latest available package and use the graphical package manager of your system to install it or do it from command line as explained below
2.5. RPM Packages
If you want to install to default location /usr/NX, run from a console any of the following commands as root:
INSTALL
rpm -ivh <pkgName>_<pkgVersion>_<arch>.rpmUPDATE
rpm -Uvh <pkgName>_<pkgVersion>_<arch>.rpmUNINSTALL
rpm -e nomachineIf you want to install to a non-default location, for example /opt/NX
INSTALL
rpm -ivh <pkgName>_<pkgVersion>_<arch>.rpm --prefix /optUPDATE
rpm -Uvh <pkgName>_<pkgVersion>_<arch>.rpm --prefix /optUNINSTALL
rpm -e nomachine
2.6. DEB Packages
If you want to install to the default location /usr/NX, run from a console any of the following commands as sudo user:
INSTALL
sudo dpkg -i <pkgName>_<pkgVersion>_<arch>.debUPDATE
sudo dpkg -i <pkgName>_<pkgVersion>_<arch>.debUNINSTALL
sudo dpkg -r nomachine
If you want to install to a non-default location, for example /opt/NX
INSTALL
sudo NX_INSTALL_PREFIX=/opt dpkg -i <pkgName>_<pkgVersion>_<arch>.debUPDATE
sudo NX_INSTALL_PREFIX=/opt dpkg -i <pkgName>_<pkgVersion>_<arch>.debUNINSTALL
sudo dpkg -r nomachine2.7. TAR.GZ Packages
If you want to install to the default location /usr/NX ensure that package is placed there.
INSTALL
cd /usr
sudo tar xvzf  <pkgName>_<pkgVersion>_<arch>.tar.gz
sudo /usr/NX/nxserver --install
UPDATE
cd /usr
sudo tar xvzf  <pkgName>_<pkgVersion>_<arch>.tar.gz
sudo /usr/NX/nxserver --update
UNINSTALL
sudo /usr/NX/scripts/setup/nxserver --uninstall then, remove the installation directory:
sudo rm -rf /usr/NXIf you want to install to a non-default location, for example /opt/NX, extract the archive in /usr/NX and then use the following commands:
INSTALL
sudo NX_INSTALL_PREFIX=/opt /usr/NX/nxserver --installUPDATE
sudo NX_INSTALL_PREFIX=/opt dpkg -i /usr/NX/nxserver --updateUNINSTALL
sudo /opt/NX/scripts/setup/nxserver --uninstallthen, remove the installation dir:
sudo rm -rf /opt/NX
2.8. The NoMachine Monitor (!M) in the System Tray
Once you have terminated the installation or the update, including reboot when requested, a NoMachine icon (!M) will appear in your system tray. This is the NoMachine Monitor, a small application which gives you fast access to server management tools and User Interface and advises you when someone is requesting to connect. It also gives fast access to the client UI (click on 'Show main window').
Click on the !M icon to open the menu and have quick access to its functionality:

'Quit NoMachine service' will shut down NoMachine server and services. You will be requested to choose whether to restart them at the next reboot or not. When services are shut down, nobody can connect by NoMachine to this computer
'Quit NoMachine player' closes all the client windows, configuration and session windows as well.
Connect to NoMachine
3. Initiating a NoMachine Connection
This section will illustrate what you need to do on your device to connect to the NoMachine server on the remote computer. Install the NoMachine client application on your device to access the remote desktop.
3.1. Connect from Your Computer to a Computer with NoMachine Installed
Pre-requisite are that any of the NoMachine server products is installed on the remote computer, that you know the IP of that computer and that you have a system account there.
If you want to connect to a computer, you will need to know its IP address. To know the IP address of a specific NoMachine host, open the NoMachine User Interface on that computer, and you will see a 'Welcome' panel like this one:

If you want to connect to this computer over the Internet, write down the external IP address and its port number. In our example: nx://151.1.192.128:29382.
If you are connecting on a local network instead, you just need the private IP, 192.168.2.29 in this case. Port is 4000 by default.
You will need this information when creating the connection to this host from your client device. Follow these quick steps:
Step 1: Go now to the client device from which you want to connect to this host. Install NoMachine, which can make connections as well as accept incoming connections, or NoMachine Enterprise Client.
Step 2: Run NoMachine User Interface (UI) from the programs or applications menu.
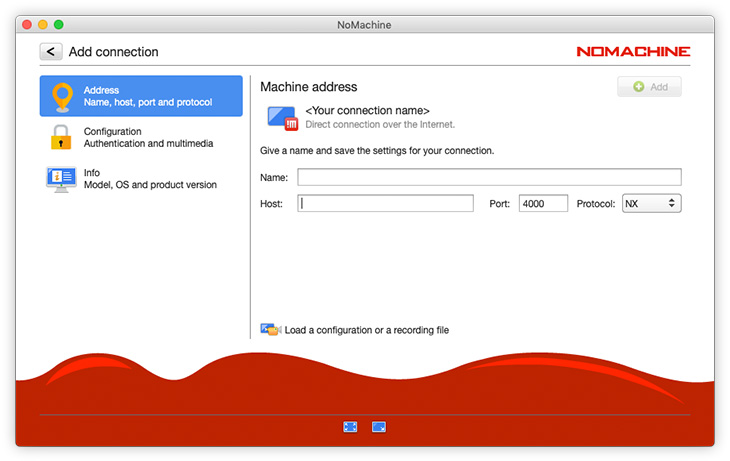
Step 3: Click on 'Add' and provide the relevant information: a name for the connection, the IP address and port number of the computer you want to connect to (you made a note of it earlier):
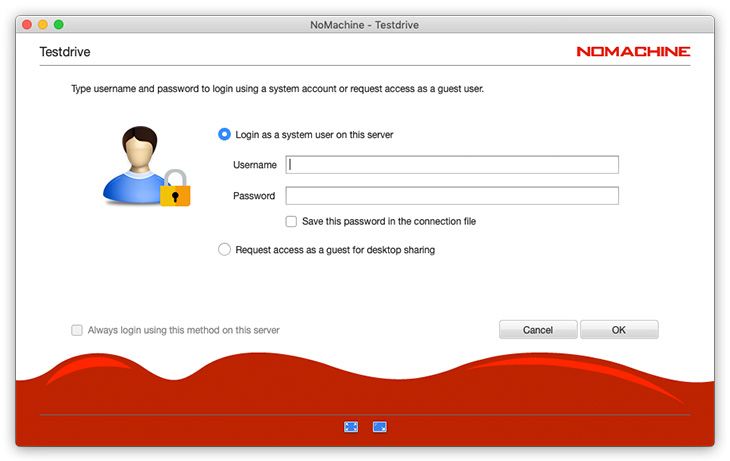
Step 4: Any available computers on your network, or connections you created appear in the 'Machines' view of the UI. For example, if you just created a connection called 'Testdrive':

Launch the connection by double clicking on its icon. You will be requested to provide username and password of a valid account for the remote computer.
(Advanced) You can configure a different authentication method by clicking on the connection icon -> Edit connection -> Configuration.
See also this Getting Started Guide: https://www.nomachine.com/getting-started-with-nomachine
Since v. 8, NoMachine free doesn't try to configure the router automatically for port mapping any longer. This means that by default it's not possible to connect from a different network to the host running your NoMachine server. You can enable the NoMachine UPnP/NAT-PMP port mapping via UI -> Settings -> Server -> Ports . Select the NX service and click on Configure button. More detailed instructions are in the 'Allowing Remote Connections Over the Internet' paragraph of this guide. In some cases, however, automatic port mapping is not possible and it's necessary to configure the router manually through its administrative interface. It's advisable that the public IP address is static.
IPv6 is supported, specify IP of the server host in IPv6 format (e.g. 2001:0:5ef5:79fb:30c6:1516:3ca1:5695) if you want to use it instead than IPv4.
3.2. What if the Remote Computer is a Headless Linux?
Pre-requisite is having a desktop environment installed. Steps to connect to the remote host are the same as described in the previous paragraph. When connecting, you are prompted with this dialog:
Cannot detect any display running. Do you want NoMachine to create a new display and proceed to connect to the desktop?
Just click on 'Yes' to let NoMachine use its own display service.
3.3. Disabling Access to the Desktop ('Desktop shared/Desktop not shared')
When you are sitting in front of the computer where NoMachine is installed or you're connected there, you can switch off/on the ability to accept connections to the desktop via NoMachine by toggling 'Desktop shared/Desktop not shared'.
You can configure this setting via the NoMachine Monitor menu (right click on the !M icon in the system tray to open it). By selecting Desktop shared -> Desktop not shared, nobody can connect except the desktop owner:
This setting lasts until you change it again, even when you physically log out from the system.
A shortcut on the bottom right of the UI allows to share/not share the desktop as well:

See also this tutorial for more details: https://www.nomachine.com/disabling-access-to-your-local-desktop
It's possible to hide the 'Desktop shared/not shared' item from the !M menu by configuring the NoMachine node.cfg file on that computer and setting:
EnableAcceptingConnections 0
Be sure to remove the pre-pending # from the key name.
3.4. 'Guest Desktop Sharing' (Connect Without an Account) New!
With Guest Desktop Sharing, you can connect to the remote computer with NoMachine free edition installed, without the need for having an account there. You will be not requested to provide credentials to log-in, but the owner of the remote desktop must approve your connection request.
Select 'Request access as a guest user' to login with Guest Desktop Sharing, instead of using the default 'Login as a system user on this server':
The Guest Desktop Sharing feature is ideal for helping friends and family remotely with on-spot assistance and troubleshooting.
It's not suitable for connecting to unattended computers since you cannot connect without authorization.
Guest Desktop Sharing is enabled by default in the free NoMachine product.
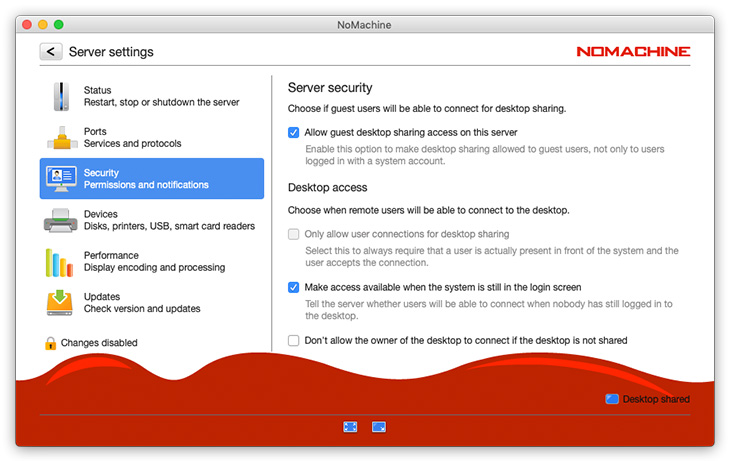
To disable it, open the UI and go to the Settings -> Server -> Security panel. Uncheck 'Allow guest desktop sharing access on this server':
3.5. Allowing Remote Connections Over the Internet
Outside the private network, only the external (called also 'public') IP address assigned to the router is visible.
To allow NoMachine traffic to get from outside into your computer at home or in the office, it's necessary to map an external port to the internal port 4000. This is called 'port forwarding' or 'port mapping'.
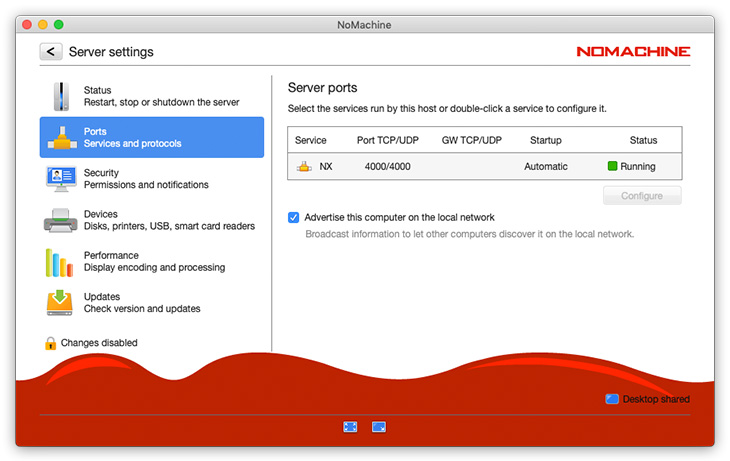
In order to enable NoMachine UPnP/NAT-PMP port mapping to configure your router automatically, open the UI and select Settings -> Server -> Ports. Select the NX service and click on Configure. You will be requested to provide administrative credentials to perform such operation:
In the new panel, select 'Use UPnP to map the port on ...' and 'Start mode' automatic. This will map the internal IP and port (4000) to the external IP and port that NoMachine client must use to connect to your computer. In the example below, external IP is 151.1.192.128 and external port is 29382:

If NoMachine fails for some reasons to map the port on the gateway, you will need to configure your router manually. We recommend to consult the official documentation of your router model for more details.
When you connect with NoMachine from an external device, set the external IP address + the external port in the connection set-up.
When the automatic port mapping is successful, IP and port are displayed in the Welcome panel when opening the UI:
Before opening the external port to allow access to your computer from public network, be sure to choose a strong password for your user account, and evaluate if you really need to keep Guest Desktop Sharing enabled.
Configurations and optimizations
4. Configuring NoMachine
Most of the configurations can be done via User Interface in the server settings, you don't need to edit manually the configuration files unless you need very specific settings.
4.1. The User Interface for Server's Administration
NoMachine comes with a graphical User Interface (UI) which lets you manage settings and configurations for the server (Settings -> Server) and for the client (Settings -> Player).
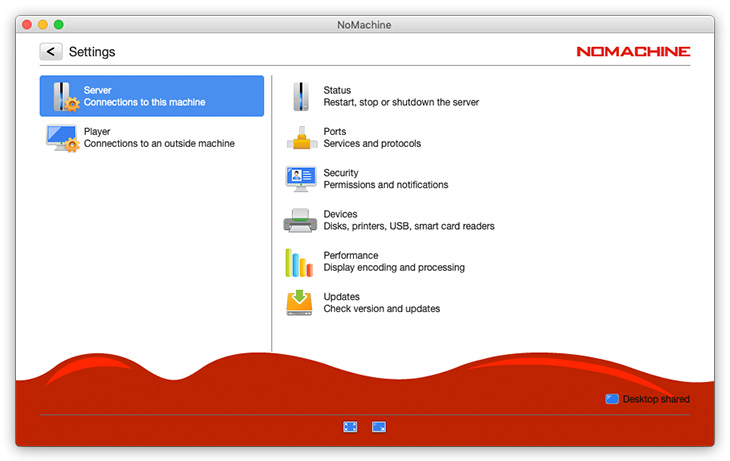
This means that you have an administrative user interface for the server from which you can for example configure privacy settings or perform updates. Server settings for NoMachine free are grouped in sub-categories: Status, Ports, Security, Devices, Performance and Updates:
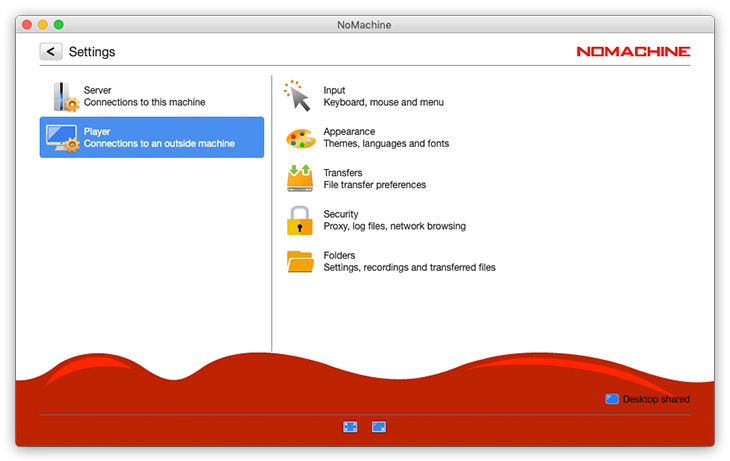
You also have an interface for configuring the client appearance when you connect to another computer. Client settings are grouped into sub-categories: Input, Appearance, Transfers, Security and Folders:
Details about the User Interface for server and its settings are available in two separate guides (for the NoMachine User Interface and the Server User Interface) available in the 'Configuration' section on the web site at https://www.nomachine.com/all-documents.
Changing server settings requires authentication with a privileged user account (administrator on Windows, 'sudo' user or root on Linux and macOS).
4.2. Quick Access to Server Administration
The Settings -> Server User Interface can be accessed also via the NoMachine (!M) icon in the system tray of your computer by clicking on 'Show server status':
The Status panel provides quick access to information like the IP of the host machine and the possibility to stop and restart the server. Click on any of the other items to open the correspondent panel and view or change settings:

The Settings -> Server area in the User Interface manages the configuration of how NoMachine functions when it accepts in-coming connections from other remote computers. For example, starting the NoMachine services automatically when the machine is rebooted; locking the physical screen of this host when someone is connected from remote, both of which can be configured in the 'Security' panel; or checking for automatic updates which can be configured in the 'Updates' panel.
There are specific tutorials showing users how to blank the screen of the host while somebody is connected from remote, or how to disable access to the computer (i.e. stop NoMachine services from accepting connections) available in the 'Tutorials' section here: https://www.nomachine.com/all-documents
4.3. Personalization of User's Interface and Other Settings for Connections to Another Computer
As mentioned earlier, it is possible to configure the appearance of the NoMachine User Interface (e.g. change language, fonts, and even color). A quick tutorial is available here: https://www.nomachine.com/customizing-appearance-nomachine-user-interface.
Clicking on the !M shortcut icon on your desktop, or opening NoMachine from the Applications or Programs menu of your computer and entering Settings will open this interface to let you configure graphical elements, the language used and so on. Just click on Settings -> Player.
From the Machines panel you can also configure your connection: right mouse click on the connection icon and 'Edit connection'.
It's also possible to configure specific behaviour to be adopted when connecting to the remote host, such as using custom hot-keys and shortcuts which must be passed from the client side to the remote desktop. We recommend you take a look at the quick guide to the NoMachine User Interface available in the 'Configuration' section here: https://www.nomachine.com/all-documents.
There are a number of specific guides and tutorials available on the website which you can consult there.
4.4. Optimization, Device Sharing and Other Functionalities During the Remote Desktop Connection
When you are connected to the NoMachine desktop, it's possible to share devices like disks and printers, change view mode for the remote display (e.g. resize the remote desktop, full-screen etc ...), adjust display quality and performance or record desktop activities.
All of this and more can be done via the NoMachine menu panel inside the session. To open it, press ctrl+alt+0 inside the session or click on the page peel in the upper right corner of the session:

See the guide to the functionality in the Menu Panel suitable for the Operating System of your client device for more details and instructions, section 'Configuration': https://www.nomachine.com/all-documents