


NoMachine Enterprise Client version 9 - Installation and Configuration Guide
Table of Contents
Introduction
1. NoMachine Enterprise Client Installation and Configuration Guide
How to set-up the Enterprise Client
2. Install the Enterprise Client
2.2. Windows Installations (install, update, uninstall)
2.3. Mac Installations (install, update, uninstall)
2.4. Linux Installations (install, update, uninstall)
Custom Settings
3. Personalizing Appearance and Behavior
Connect to the Remote Computer
4.2. Connecting Physical or Virtual Desktop and Custom Sessions
4.3. Displaying the Remote Session on Your Computer
4.4. Closing Physical and Virtual Desktop and Custom Sessions
4.5. Launching Browser-based Sessions with the Client
4.6. Login as a Guest Desktop Sharing
Facilities Inside the Session
5.2. The NoMachine Monitor Menu
5.3. Blanking of the Physical Screen and Auto Lock Upon Disconnecting
Administer the Remote Server with your Client (Advanced)
6. The Enterprise Client for NoMachine Administrators
6.1. Pre-configuring the Client for End-Users
Introduction
Welcome to the NoMachine Enterprise Client - Installation and Configuration Guide v. 9.
1. NoMachine Enterprise Client Installation and Configuration Guide
What is NoMachine Enterprise Client for?
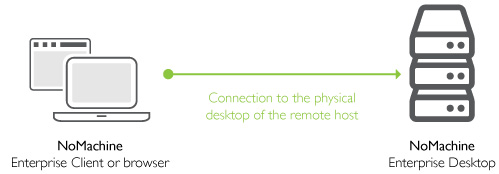
NoMachine Enterprise Client is a software designed to let you connect to a remote computer where any of the NoMachine server products, including the free version, is installed. This client-side package doesn't include the 'server' component of NoMachine making the application much lighter. Additionally, it doesn't permit incoming connections from other remote desktops, therefore helping to address the often complex issues of compliance requirements and endpoint security.
For example let's say there is an Enterprise Desktop running on the remote computer, you can connect from the Enterprise Client on your machine to the remote physical desktop:
You can also use your browser to connect to the remote computer: this works with any server product, except the free version of NoMachine. (Connecting via the browser on your client device means that you do not need to have Enterprise Client installed). Once connection is established, login to the remote computer: you need a valid account on the remote computer or you can access it as a guest, if guest desktop sharing is enabled and the owner of the remote desktop authorizes you.
With the Enterprise Client, you can also login to your NoMachine Network account or create it and register to the service. With a subscription, you can then connect to a remote machine via that service, you just need to know the Machine ID of that computer and its Access ID if enabled, once it's made available on Network.
Client packages are available for Windows, macOS, Linux and also for Android and iOS mobile devices, included smartphones.
A Graphical Interface
The client is equipped with a native graphical User Interface (UI) providing a number of functionalities that we can group into the following:
1) Registration to NoMachine Network
2) Creation of a new connection by IP or NoMachine Network ID
3) Displaying of the remote desktop.
4) Easy access to recent connections (Machines) and computers in the same network if any.
5) Preferences to personalize aspect and behavior of the client (Player settings)
6) Interface for remote server administration (advanced).
7) Interface for multi-node management (advanced).
Note that all NoMachine server types (included NoMachine free) provide the client UI and can work as a client to connect to a remote machine hosting a NoMachine server. In the case of servers, it's possible to switch between 'Player' and 'Server' settings to access their respective configuration.
1.1. About This Guide
This guide is organized in different sections which deal with client's installation, configuration and administration (advanced).
Online Resources
Visit the NoMachine Support Area to access a variety of online resources included the NoMachine Forums, tutorials and FAQs: https://www.nomachine.com/support
Find a list of all documents and tutorials: https://www.nomachine.com/all-documents
Use the Knowledge Base search engine to access articles, FAQs and self-help information: https://kb.nomachine.com
Leave Feedback About This Guide
Our goal is to provide comprehensive and clear documentation for all NoMachine products. If you would like to send us your comments and suggestions, you can use the contact tool available at https://www.nomachine.com/contact-request, selecting Web Quality Feedback as your option.
2. Install the Enterprise Client
This chapter provides instructions to install, update and uninstall the client package, also from a terminal.
2.1. Prerequisites
Supported Operating Systems
Windows 32-bit/64-bit 7/8/8.1/10/11
Windows Server 2008/2012/2016/2019/2022
Mac OS X Intel 64-bit 10.9 to 10.11/macOS Intel 10.12 to 15/macOS Apple Silicon 11 to 15
Linux 32-bit and 64-bit
RHEL 6.0 to RHEL 9
CentOS 6.0 to CentOS 8.5
CentOS Stream 8 to CentOS Stream 9
SLED 11 to SLED 15
SLES 11 to SLES 15
openSUSE 11.x to openSUSE 15.x
Fedora 10 to Fedora 40
Debian 5 to Debian 12
Ubuntu 8.04 to Ubuntu 24.04
Raspberry Pi 2 ARMv6/ARMv7
Raspberry Pi 3 ARMv6/ARMv7/ARMv8/
Raspberry Pi 4 ARMv7/ARMv8
Raspberry Pi 5 ARMv7/ARMv8
ARMv7/ARMv8
iOS 8.0 or later
Android 4.1 or later
Hardware requirements
Intel Core2 Duo or AMD Athlon Dual-Core or equivalent
1 GB RAM
Network connection (either a LAN, or Internet link: broadband, cable, DSL, etc...)
Size required on disk:
Windows 85 MB
Linux 80 MB
Mac 80 MB
ARMv6 70 MB
ARMv7 60 MB
ARMv8 78 MB
Compatibility Between Client/Server Versions
Compatibility between client v9 and server v8 or v7 is preserved. It's however strongly suggested to upgrade both client and server to the last version, in order to benefit from all the features sported by the newest version, included the ability to connect by NoMachine Network.
2.2. Windows Installations (install, update, uninstall)
INSTALL
Download the NoMachine Enterprise Client EXE package from the NoMachine web site and double click on the package icon: the Setup wizard will take you through the installation.
INSTALL FROM CONSOLE
To install the package in silent or very silent mode from a CMD console, run respectively:
> nomachine-packageName_packageVersion.exe /silent
or:
> nomachine-packageName_packageVersion.exe /verysilent
It's also possible to specify a non-default location:
> nomachine-packageName_packageVersion.exe /SILENT /DIR="X:Target_directory"
or:
> nomachine-packageName_packageVersion.exe /VERYSILENT /DIR="X:Target_directory"
To skip the installation of USB modules, specify the usbinstall=0 option:
> nomachine-packageName_packageVersion.exe /usbinstall="0" /silent "
or:
> nomachine-packageName_packageVersion.exe /usbinstall="0" /verysilent"
Note that next updates via command line will still require to specify the usbinstall=0 option to skip the installation of USB modules. If you don't specify it, the USB module will be installed.
To skip the installation of printer's drivers, specify the printerinstall="0" option:
> nomachine-packageName_packageVersion.exe /printerinstall="0" /silent "
or:
> nomachine-packageName_packageVersion.exe /printerinstall="0" /verysilent"
To reboot:
> shutdown /r /t 10 /c ” your comments here”UPDATE
There are two ways to update your current installation:
- Automatic updates
You can update your installation from our repositories. Just run the NoMachine UI from your Programs Menu and access the Settings -> Updates panel. Then click on the 'Check now' button.At every startup, NoMachine Enterprise Client checks our repositories to verify if updates are available or checks the repositories every two days. If updates are available, the server will issue a dialog informing that a new version is available but it will never automatically update the current installation.
Checking for updates can be disabled from that dialog by selecting the 'Don't ask again for this version' option or in the Updates panel by unchecking the 'Automatically check for updates' option.Detailed instructions for configuring the Automatic Updates are available in a separate document in the Configuration section at: https://www.nomachine.com/all-documents .
- Update with NoMachine packages
Alternatively, download the latest available package from the NoMachine web site and click on the executable file to launch Setup. As for the installation, Setup will guide you through all steps necessary for updating your installation.
UNINSTALL
On Windows 10 and 11 right click on Start button choose Apps and Features and scroll down to 'NoMachine'. Select it and uninstall. Otherwise open the search box, type 'Control panel' to open it. Then go to Programs, Programs and Features and uninstall NoMachine from there.
On Windows 8 you can use the Search box from the Charms bar on the right side of the screen: type Control Panel to open it. Then access the Programs - 'Uninstall a program' panel.
On Windows 7 click on the Start button and click to open the Control panel from the Start menu. Then access panel 'Programs and Features' and choose to uninstall NoMachine Enterprise Client.
UNINSTALL FROM CONSOLE
To uninstall from a CMD console, move to C:/ProgramData/NoMachine/var/uninstall/ . Then run:
> unins000.exe /silent
or:
> unins000.exe /verysilent
Uninstalling is completed when your command prompt is back.
2.3. Mac Installations (install, update, uninstall)
INSTALL
Download the NoMachine Enterprise Client package for your macOS from the NoMachine web site and double click on the package icon to mount the disk image. Next double-click on the package to install it; the Installer will take you through the installation.
INSTALL FROM TERMINAL
To install from the command line, run:
CODE here$ NXMOUNTDIR=$(echo `hdiutil mount nomachine-packageName_packageVersion.dmg | tail -1 | awk '{$1=$2=""; print $0}'` | xargs -0 echo)

$ sudo installer -pkg "${NXMOUNTDIR}/NoMachine.pkg" -target /CODE here
UPDATE
There are two ways to update your current installation:
- Automatic updates
You can update your installation from our repositories. Just run the NoMachine UI from your Programs Menu and access the 'Settings' -> 'Updates' panel. Then click on the 'Check now' button.At every startup, NoMachine Enterprise Client checks our repositories to verify if updates are available. In this case, the server will prompt a dialog informing that a new version is available but it will never automatically update the current installation.
Checking for updates can be disabled from that dialog by selecting the 'Don't ask again for this version' option or in the Updates panel by unchecking the 'Automatically check for updates' option.Detailed instructions for configuring the Automatic Updates are available in a separate document in the Configuration section at: https://www.nomachine.com/all-documents .
- Update with NoMachine packages
Alternatively, download the latest available package from the NoMachine web site and click on the executable file to launch Setup. As for the installation, Setup will guide you through all steps necessary for updating your installation.
UNINSTALL
To uninstall the Enterprise Client, drag and drop NoMachine from Applications to trash or select 'Move to trash' from the mouse button menu. This will uninstall all the NoMachine software.
UNINSTALL FROM THE COMMAND LINE
To uninstall from command line, remove the NoMachine application directory:
$ sudo rm -rf /Applications/NoMachine.app2.4. Linux Installations (install, update, uninstall)
Installing for the first time
You can install, update and uninstall using the graphical package manager of your Linux distribution or from command line by running commands from an xterm or similar with the sudo utility, or as root user if you don't have sudo installed. Instructions below refer to installation by command line.
There are two ways to update your current installation:
- Automatic updates
You can update your installation from our repositories. Just run the NoMachine UI from your Programs Menu and access the 'Settings' panel, go to the 'Updates' UI and click on the 'Check now' button.At every startup, NoMachine Enterprise Client checks our repositories to verify if updates are available. In this case, it will prompt a dialog informing that a new version is available but it will never automatically update the current installation.
Checking for updates can be disabled from that dialog by selecting the 'Don't ask again for this version' option or in the Updates panel by unchecking the 'Automatically check for updates' option.Detailed instructions for configuring the Automatic Updates are available in a separate document in the Configuration section at: https://www.nomachine.com/all-documents .
- Update with NoMachine packages
Alternatively, download the latest available package from the NoMachine web site and click on the executable file to launch Setup. As for the installation, Setup will guide you through all steps necessary for updating your installation.
2.5. RPM Packages
If you want to install to the default location, namely /usr/NX/:
INSTALL
# rpm -ivh <pkgName>_<pkgVersion>_<arch>.rpm
To find out which NoMachine package you have installed (you will get the full name of the package), run:
# rpm -qa | grep nomachine
UPDATE
# rpm -Uvh <pkgName>_<pkgVersion>_<arch>.rpmUNINSTALL
# rpm -e nomachine-enterprise-clientFor non-default locations, for example /opt/NX:
INSTALL
# rpm -ivh <pkgName>_<pkgVersion>_<arch>.rpm --prefix /opt
UPDATE
# rpm -Uvh <pkgName>_<pkgVersion>_<arch>.rpm --prefix /opt
UNINSTALL
# rpm -e nomachine-enterprise-clientCODE here
2.6. DEB Packages
If you want to install to the default location, namely /usr/NX/:
INSTALL
$ sudo dpkg -i <pkgName>_<pkgVersion>_<arch>.deb
To find out which NoMachine package you have installed (you will get the full name of the package), run:
$ dpkg -l | grep nomachine
UPDATE
$ sudo dpkg -i <pkgName>_<pkgVersion>_<arch>.debUNINSTALL
$ sudo dpkg -r nomachine-enterprise-clientFor non-default locations, for example /opt/NX:
INSTALL
$ sudo NX_INSTALL_PREFIX=/opt dpkg -i <pkgName>_<pkgVersion>_<arch>.deb
UPDATE
$ sudo NX_INSTALL_PREFIX=/opt dpkg -i <pkgName>_<pkgVersion>_<arch>.deb
UNINSTALL
$ sudo dpkg -r nomachine-enterprise-client
2.7. TAR.GZ Packages
If you want to install to the default location, namely /usr/NX/, ensure that package is placed there.
INSTALL
$ cd /usr
$ sudo tar xvzf <pkgName>_<pkgVersion>_<arch>.tar.gz
$ sudo /usr/NX/nxclient --install
UPDATE
$ cd /usr
$ sudo tar xvzf <pkgName>_<pkgVersion>_<arch>.tar.gz
$ sudo /usr/NX/nxclient --update
UNINSTALL
$ sudo /usr/NX/nxclient --uninstall
$ sudo rm -rf /usr/NX
For non-default locations, for example /opt/NX:
INSTALL
$ sudo NX_INSTALL_PREFIX=/opt /usr/NX/nxclient --install
UPDATE
$ sudo NX_INSTALL_PREFIX=/opt /usr/NX/nxclient --update
UNINSTALL
$ sudo /opt/NX/nxclient --uninstall
$ sudo rm -rf /opt/NX
3. Personalizing Appearance and Behavior
Find here among the others how to change UI themes or set preferences for input devices, check the version and update the installation from the NoMachine repositories.
3.1. The Player Settings UI
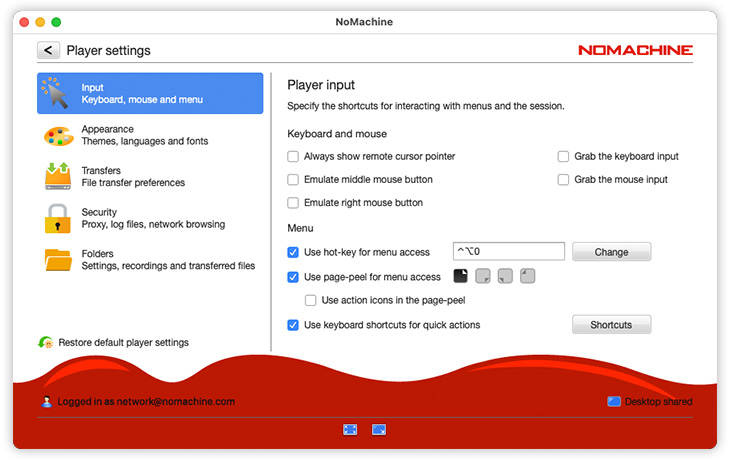
Launch the NoMachine Enterprise Client program, then click on the 'Settings' button in the UI to access Player settings:
You will see that the Player settings panel is made of two sections, in the left area there's the menu where you can select which panel to open in the right area for changing configurations:
- Set preferences for input devices and keyboard shortcuts (Input).
- Customize UI appearance and language (Appearance).
- Set preferences for transferring files from/to remote (Transfers).
- Save log files (or not) and screenshots, disable network browsing (Security).
- Modify store directories for NoMachine files, including connection files and recordings (Folders).
- Find out the version of your client and manage the automatic updates (Updates).
4. Initiating a Connection
Pre-requisite is that any of the NoMachine server products, including NoMachine free, is installed on the remote computer. If you're not using the NoMachine Network service, you need to know the IP of the remote computer and the listening port.
To be able to login to the remote computer, you also need to have a valid account on that machine.
Otherwise, if Guest Desktop Sharing is enabled on the NoMachine server, you can connect to another user's desktop upon the owner's approval, without the need for an account. Guest Desktop Sharing is available with any server products, including the free version.
4.1. Creating New Connections
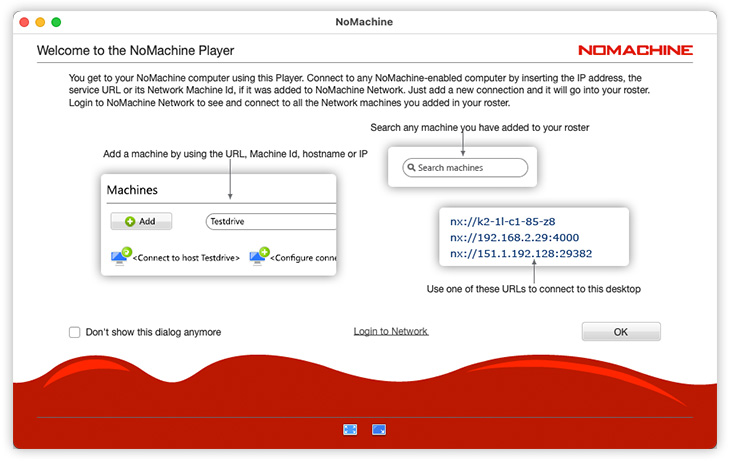
To connect the first time to the remote computer, or to create a new connection, click on 'Add' button at top left, then on 'Add connection':
Provide the relevant information: a name for the connection, the IP address or hostname and port number of the computer you want to connect to.
If you're logged to NoMachine Network and own a valid subscription and if the remote computer is online in NoMachine Network, you can provide instead the machine ID of that computer.
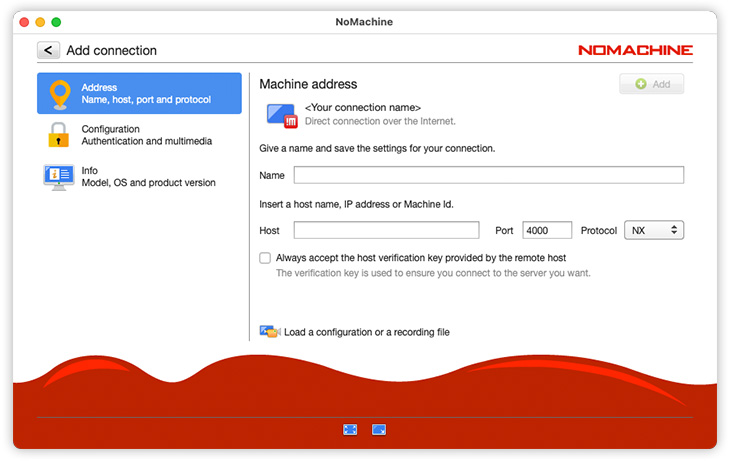
If you are connecting on a local network, provide the internal IP of the remote host, the default port (4000 for protocol NX) is suitable for most cases, unless the administrator has changed it on the server.
If you connect over the internet, use the public (or external) IP of the remote host and the assigned external port.
These data can be retrieved on the remote host by opening the NoMachine UI on the remote host:
When connecting to a NoMachine (free) server, only the NX protocol is available. When connecting to a commercial server, you can choose to use the SSH protocol or the HTTP protocol. In this last case, the session will be launched in your browser.
For a more advanced configuration, click on item 'Configuration' in the menu on the left:
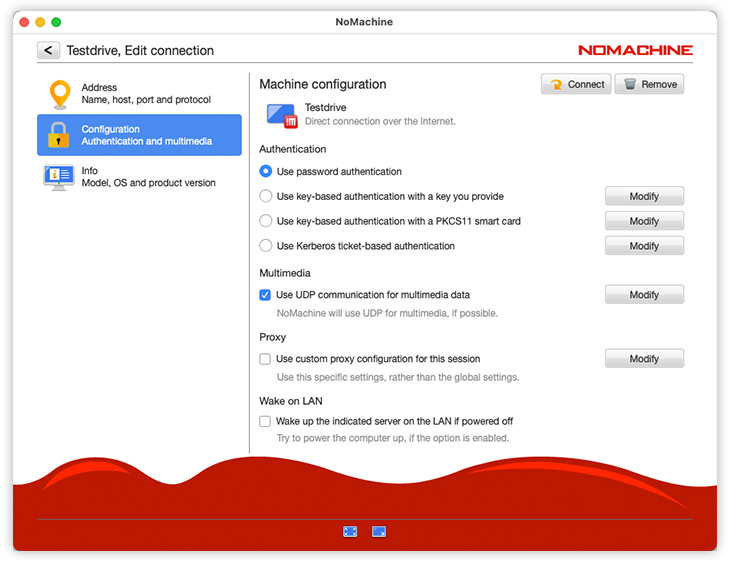
It is possible to define any of the authentication methods available for the given protocol (NX, SSH or HTTP) and others options. The authentication method must be already configured and properly working on the remote computer. Note that password-based authentication is the method used by default by NoMachine.
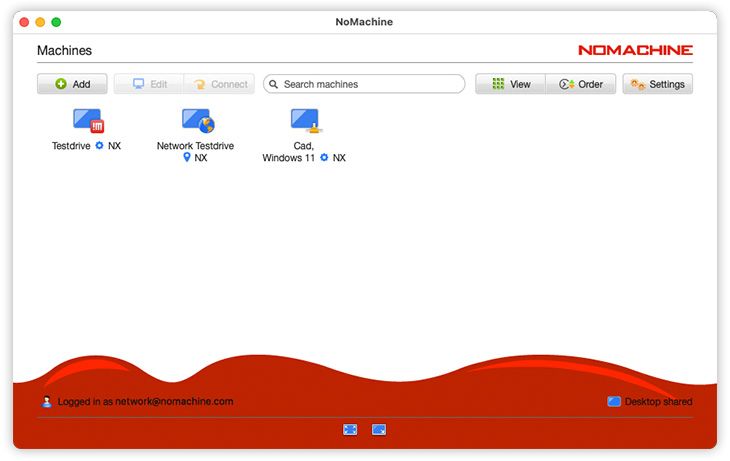
Once the connection is created, it will be listed in the first opening panel of the client, 'Machines'.
To connect to the remote computer, double-click on the connection icon.
Right-click on the icon, instead, opens a context menu where you can choose to:
- Start connection.
- Edit connection (to modify its settings).
- Rename connection.
- Remove connection (from the 'Machines' list and permanently delete it).
- Connection info.
- Create a copy file.
Connection settings can be edited at any moment: click on the connection icon in the UI ('Machines') to open the context menu and select 'Edit connection'. In the 'Edit connection panel' you can choose what to do from the menu on the left area:
- Modify connection name, IP of remote computer, port and protocol (Address)
- Modify the authentication method (Configuration)
- Access connection info (Info)
Once the connection is created, it is saved in a .nxs file. The .nxs files are not intended to be edited manually, even if this is possible, for example to preconfigure a connection (for advanced users).
These files are stored in the directory defined by 'Connections and recordings' in the Settings -> Folders panel in the UI, by default:
on macOS: /Users/USERNAME/Documents/NoMachine
on Windows: %USERPROFILE%\Documents\NoMachine
on Linux: /home/USERNAME/Documents/NoMachine
4.2. Connecting Physical or Virtual Desktop and Custom Sessions
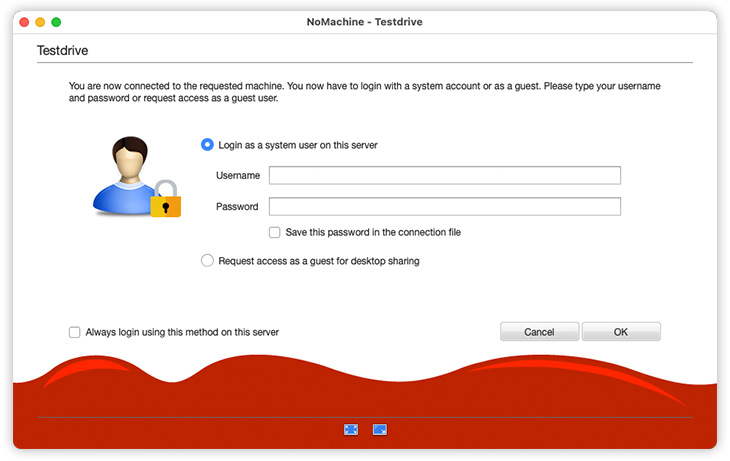
Login to the remote host when requested. Insert credentials of a valid account on that remote computer in the 'Username' and 'Password' fields when shown in the client UI, password cannot be empty.
If Guest Desktop Sharing is disabled on the server (this is default for commercial servers), there is only the option to insert username and password.
If Guest Desktop Sharing is instead enabled (default for NoMachine free), choose 'Login as a system user on this server' option in the login UI to login with your username and password.
You can also save the password to re-use it at the next connection and skip the login dialog. If saving credentials is not possible, it means that your administrator has configured the server to prevent users from storing credentials.
Otherwise it's possible to 'Request access as a guest for desktop sharing' to connect to the physical desktop of the remote machine.
Only in case of a Linux host with a server supporting NoMachine virtual desktops/custom sessions and with Virtual Desktop Guests (System Guest Users Accounts) enabled, there are two options for guest access: 'Request access as a guest for desktop sharing' and 'Request a virtual desktop running as a guest'.
With 'Request access as a guest for desktop sharing' the owner of the remote desktop will always have to approve your connection request.
With 'Request a virtual desktop running as a guest' the server will automatically generate a system account (guest user) for you and you don't need to know your access credentials. This is available only when the NoMachine server supports this feature and the administrator has configured the server to provide it.
Connections to the physical desktop
Once logged-in, if you connect to a NoMachine (free) server or to the Enterprise Desktop, you will be immediately connected to the physical desktop of the remote machine. When you are connected to the physical desktop, it's like if you are sitting in front of the remote computer.
If the remote desktop is owned by another user, he/she will have to authorize your connection. This is the default behaviour, which can be changed by configuring the server (except for Guest Desktop Sharing Users who must be always approved).
When the login screen is active on the remote computer, you will be able to enter with any of the system accounts enabled for that.
If the remote screen is locked, you will have to unlock it by providing the password of the logged user.
Creating a NoMachine virtual desktop (on Linux)
If you are connecting to any of the NoMachine terminal servers on Linux instead, you will be able to choose between creating a virtual desktop or a custom session. Click on 'Create a new desktop or custom session' and choose to create a new desktop.
Save your choice by selecting 'Save this settings in the connection file' wherever this flag is available, it's at the bottom left of the client window . The session type you decided to start will be re-used the next time you run this connection and you will skip steps to select it.
A NoMachine virtual desktop is an individual instance of the remote Linux desktop: it's your personal desktop.
Many users can each have his/her own virtual desktop on the same remote host as you. That's why when you connect you can see also their sessions listed in the client UI. Click on the 'My desktop/All desktops' button to switch view list and show only your own virtual desktops or also those of other users. This last view mode is useful if you need to connect to the desktop of someone else to carry out collaborative work (session collaboration or desktop sharing). Virtual desktops can be shared in interactive or view-only mode. The desktop owner can give interaction or view-only permissions to the connected users at any moment during the session.
When you close the virtual session or application (i.e. you disconnect but don't terminate it), you will find it listed once you log-in the next time. Instead of choosing 'Create a new desktop' you can click on any of your virtual desktops to reconnect it.
Creating a NoMachine custom session (on Linux)
A custom session permits a Linux application to be run as a single application. It's an alternative to running the full desktop. To run a single application, select in the UI 'Run the following command' and provide the command to launch the application. Ensure to have 'Run the command in a floating window' option selected:
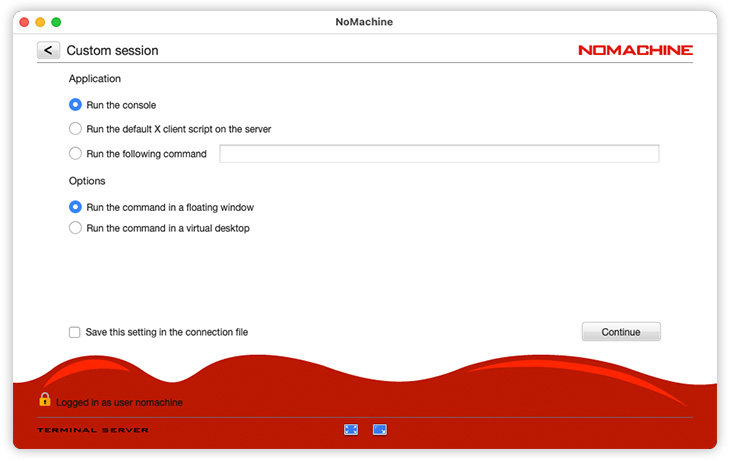
More in details, the Application area permits to define which remote application will be run:
Run the console will launch a system terminal.
Run the default X client script on the server will execute the X client script set on the remote host.
Run the following command specifies the application to be launched. If such application is not in the path on the remote host, it's necessary to provide the full path in the UI field.
For example if 'firefox' is in the path, it's enough to write in the command field: firefox. If it's not in the path, it's necessary to specify the full path such as: /usr/bin/firefox. If the application supports options, they can be specified in the command as well. E.g. to open a URL in a new tab: /usr/bin/firefox -new-window http://www.nomachine.com/
In the Options area you can define if the application has to be run as single application or embedded in the NoMachine client window by selecting respectively: Run the command in a floating window or Run the command in a virtual desktop.
4.3. Displaying the Remote Session
Once the session is started, you will be welcomed by a series of tutorial panels to explain which NoMachine tools are at your disposal to manage the session. They show in the following order:
1. How to open the NoMachine menu panel inside the session (click on the page peel at the top right or ctrl+alt+0); how to change screen resolution (icon buttons at the bottom of the window)
2. What each buttons in the menu panel stays for.
3. Audio streaming, select to play or not audio on the server (only for connections to physical desktop and not displayed if user connects in view-only mode)
4. Display resolution (scale, or enable scrollbars or change remote resolution to match the client)
5. Display resolution (resize of the remote display, not displayed if user connects in view-only mode)
After completing all the introductory steps, you are in!
By default you have access to the remote desktop (either physical or virtual) in interactive mode, and you can use applications, access files and directories exactly as if you are sitting in front of the remote computer.
Select 'Don't show this message again' at the bottom left of the client window to skip tutorials the next time you run this session.
4.4. Closing the Session
Let's distinguish between when you are connected to the (i) physical desktop of the remote machine and when you are running (ii) a virtual desktop or a custom session.
Closing physical desktop sessions
You can close the connection to the remote physical desktop by clicking on the X in the upper right corner of the client window or open the NoMachine menu (ctrl+alt+0), enter the 'Connection' panel and click on 'Disconnect'.
The default shortcut to close it is: Ctrl+Alt+T.
You can reconnect to the physical desktop at any time, by launching your connection again.
Closing virtual desktops and custom sessions
To close a virtual desktop and be able to reconnect it later, simply close the client window by clicking on the X button in the upper right corner. Otherwise, open the NoMachine menu (ctrl+alt+0), enter the 'Connection' panel and click on 'Disconnect'. You will be able to reconnect your session later, even from a different computer (we call it 'session migration'). If you left an application running inside the session (e.g. a graphics program rendering images), you will find it still running once reconnected.
Instead, if you need to terminate the virtual desktop, simply log-out from the system. Otherwise open the menu panel inside the session (ctrl+alt+0) and use the 'Terminate' button in 'Connection' panel.
To disconnect a custom session, close the client window showing the NoMachine menu (not the window of the custom application!) Otherwise use the 'Disconnect' button in the connection panel.
If you use a program to elaborate data, disconnect the NoMachine virtual session and let the program continue its operations.
To teminate the NoMachine virtual desktop, close the application window.
4.5. Launching Browser-based Sessions with the Client
If you're connecting to a NoMachine server which supports web sessions, you can create web-based sessions in the same way as a traditional connection, just select HTTPS as the protocol to be used.
The client will create a .nxw file stored in the same place of the .nxs connection files for client-based sessions. The web-based connection file is then displayed in the 'Machines' panel of the client UI together with your traditional NoMachine sessions and computers advertised on the LAN etc.
Additionally, it is possible to copy the web-connection file as a pre-configured link which can be re-used on other computers or devices (even without NoMachine client installed) to connect to the server via web. Double-click on that file to trigger the browser and start the session via browser.
The link to launch the web session is a system file formatted for the OS on which it was created. Therefore, if you create the link on macOS, it can be used only on macOS systems. If you create it on Windows systems, only other Windows systems will be able to use it, and so on.
You can find a detailed guide in the 'Tutorials' section here: https://www.nomachine.com/all-documents
4.6. Login as a Guest Desktop Sharing
With Guest Desktop Sharing, you can connect to the remote desktop, either physical or virtual, without the need for a valid account on the remote computer. The desktop owner however must grant access by authorising your guest connection request.
You cannot use Guest Desktop Sharing if the remote computer is running unattended because the deskop owner's approval is mandatory.
Guest Desktop Sharing must be enabled on the remote computer, then you will have the possibility to choose between 'Request access as a guest user' or 'Login as a system user on this server'. Select the first option to login with Guest Desktop Sharing:
4.7. Creating a NoMachine VPN
The NoMachine built-in VPN service allows to setup your Virtual Private Network for NoMachine connections without the need to use a third party program. Each NoMachine client can start one single VPN: open the UI and click on the Add button to 'Add VPN connection'. More details are available here: https://www.nomachine.com/AR03U01193
The VPN is not available if the server is the free version of NoMachine.
4.8. Enabling NoMachine 2FA
The NoMachine built-in 2FA (two-factor authentication) relies on the NoMachine Network service, you need to have a NoMachine Network account for using it (it's free) and install the NoMachine app for iOS and Android on your mobile device to receive push notifications. 2FA can be used to protect your identity against account takeover and/or to verify all connections to the desktop.
More details about NoMachine 2FA can be found here: https://www.nomachine.com/AR10Q01054
5. NoMachine Menus and Others
This chapter provides an overview of which tools are at your disposal to configure the session behavior and use the available NoMachine services. More specific guides dealing with some functionalities in detail are available in the 'Tutorials' section here: https://www.nomachine.com/all-documents
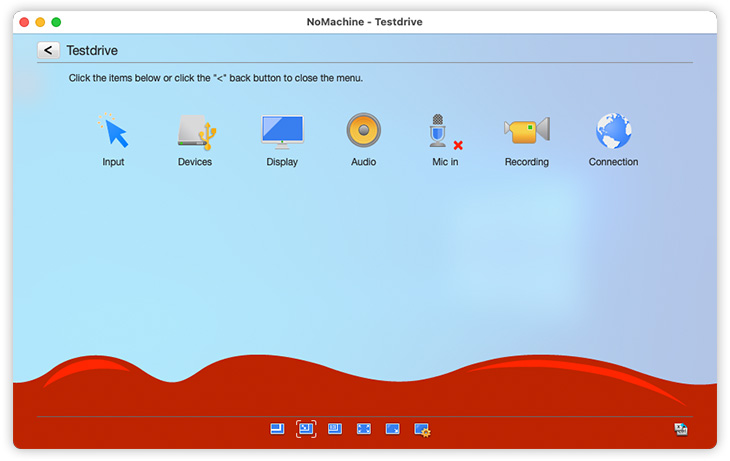
5.1. The NoMachine Menu Panel
To open the NoMachine menu panel inside the session, enter the key combination Ctrl+Alt+0 or move your cursor to the page-peel in the top right-hand corner of the window:
The menu panel is like a console providing some facilities you can use while running the session, for example use it to:
- Emulate the middle mouse button if your mouse has three buttons or a clickable scroll wheel (Input)
- Define shortcuts to quickly terminate the session, toggle to fullscreen, minimize the client window and more (Input).
- Connect disks, printers, USB devices and more from local to remote and vice-versa (Devices)
- Tune display settings at runtime like quality of images and screen resolution (Display)
- Mute audio and microphone or tune volume (Audio and Mic in)
- Record a video of the session or of your local desktop and play it (Recording)
- Retrieve statistics of the data traffic generated by the NoMachine session (Connection).
It looks like this:
For more details and instructions, see the Menu Panel guide suitable for your Operating System in the Configuration section at https://www.nomachine.com/all-documents
5.2. The NoMachine Monitor Menu
A NoMachine Monitor is present on your computer (where the NoMachine Enterprise Client is installed) and on the remote computer (where any of the available server types is installed). Let's distinguish the two cases.
The Monitor menu for the client
To open the Monitor menu, execute a right mouse click on the !M icon the system tray of your computer:

The Monitor menu for the server
To open the Monitor menu on the remote computer where the server is installed, right mouse click on the !M icon the system tray of the remote desktop:

This menu gives quick access to some facilities like:
- Enable/disable the sharing of the desktop
- Show the main window of the NoMachine UI
Other options like 'Show server status' are reserved to the server administration and give access to NoMachine Server settings. Changing settings in this panel requires to have administrative privileges on the server host.
Detailed guides for the NoMachine Monitor and the Server UI are available in the Configuration section at https://www.nomachine.com/all-documents
5.3. Blanking of the Physical Screen and Auto Lock Upon Disconnecting
Blanking the remote screen and auto lock are server side options that apply when users connect to the physical desktop of the remote host.
They can be both enabled/disabled via the Server Settings UI in the Security panel on the remote computer, but you need to be an administrator on the server to change these settings.
Screen blanking is possible only on physical machines, it is not supported on virtual machines since it has effect on the physical monitor.
For more details on server side configurations, refer to the NoMachine Server UI guide in the 'Configuration' section at https://www.nomachine.com/all-documents
5.4. Disabling Screen Sharing
Disabling screen sharing is a server side option, i.e. you can disable access to your local desktop via NoMachine. It applies only to the physical desktop, either if you are sitting in front of the desktop or you are connected from remote.
Open the NoMachine Monitor menu (click on the !M icon in the system tray) of the remote desktop and toggle Desktop shared/Desktop not shared to switch on/off access to your desktop.
When the sharing of the desktop is disabled, it lasts until you change it again. It persists also when you are physically logged-out or closed the NoMachine connection.
If the computer is your own and you need to access it remotely, you can still connect even when the desktop is not shared, if your user is also the owner of the remote desktop.
5.5. Multi-Monitor Support
NoMachine has full multi-monitor support for multiple monitors connected on the end-user's side as well as for those connected to the remote server computer.
Multiple monitors connected to your computer
If you have more than one monitor connected to your computer you can display the NoMachine session window on a single monitor (you can resize the window or send it at fullscreen) or spawn at fullscreen the session windows on all monitors.
To adapt the session window or access the Display settings for tuning quality and resolution, use the small icons (quick access display icons) in the footbar of the NoMachine menu panel. Move the mouse over each icon to display its label.
Multiple monitors connected to the remote computer
When the remote computer has multiple monitors, you can switch through those monitors by using shortcuts:
Ctrl+Alt+I to identify the monitor.
Ctrl + Alt + MonitorID to change the current monitor.
Ctrl + Alt + A to view all monitors.
Default shortcuts can be personalized in Player Settings -> Input panel by clicking the 'Shortcuts' button.
It's possible to switch monitors also from the NoMachine menu by using the quick access display icons in the footer of the menu.
Select the monitor you wish or view all the monitors in one window.
6. The Enterprise Client for NoMachine Administrators
6.1. Pre-configuring the Client to End-Users
Client configuration file (player.cfg) and connection files (*.nxs) are not intended to be edited manually, they are created automatically by the client according to options set via the UI.
In some cases, however, administrators may need to facilitate users connecting so they don't have to define specific setting themselves. Administrators can tune settings in player.cfg and pre-configure the connection file according to their needs. These files can then be distributed to users.
You can find at: https://www.nomachine.com/all-documents a detailed guide to preconfigure client sessions (section 'Configuration') and Tutorials dealing specifically with the administrations of multi-host environments via UI (section 'Tutorials').
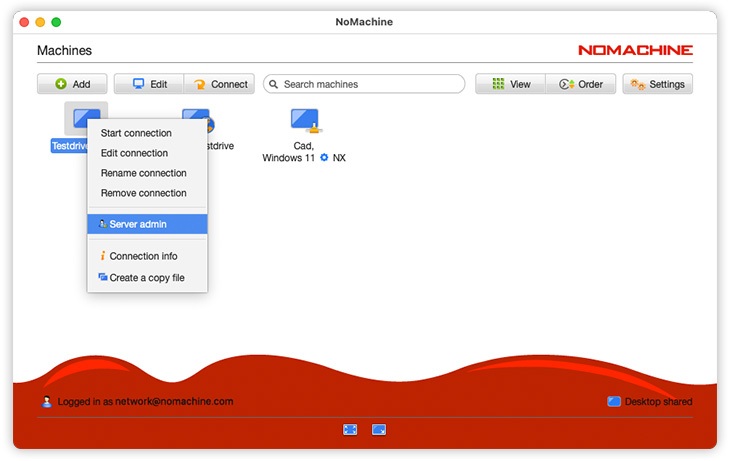
6.2. Administering the Remote Server via Client UI
Open the client UI on your computer, select the remote server that you want to administer in the 'Machines' panel and right mouse click to open the menu. Choose 'Server admin' and login as administrator to that server host when requested:
You will access the server UI, similarly to what you can when opening it directly on that computer from the !M icon in the system tray:
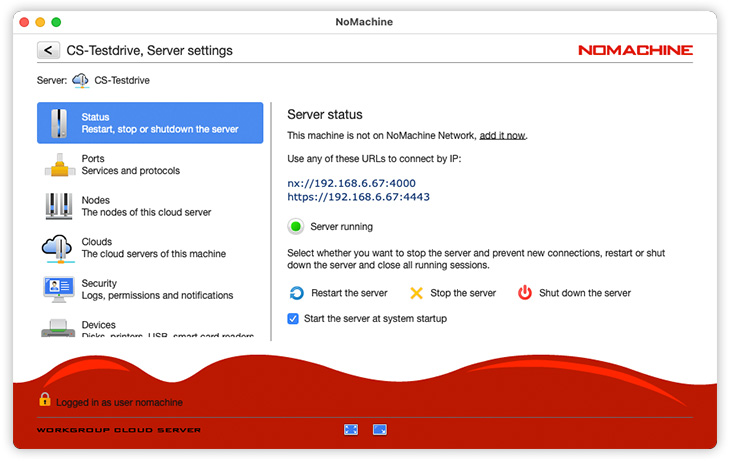
With this new feature there is no longer need to start a desktop session on the remote computer to access its server UI. This is useful for example to perform Updates via UI or administering the server when it's configured to hide Server settings from the !M menu.
From this UI you can for example retrieve logs or monitor how many users are connected or enable/disable device sharing and multimedia service:

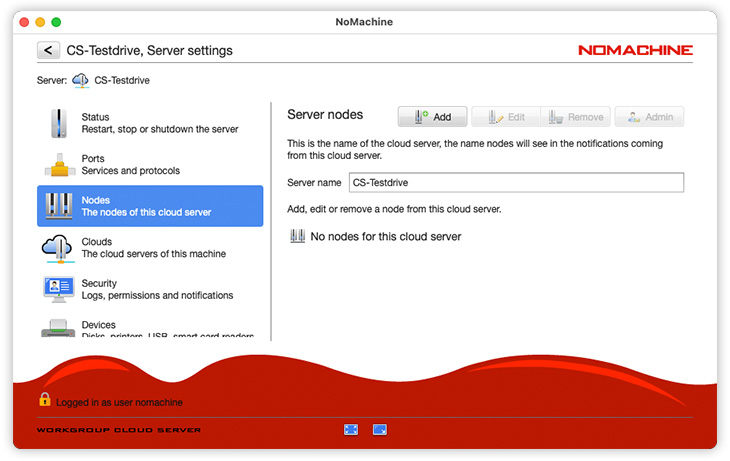
If the remote server is a cloud server, you will be able to add/remove nodes:
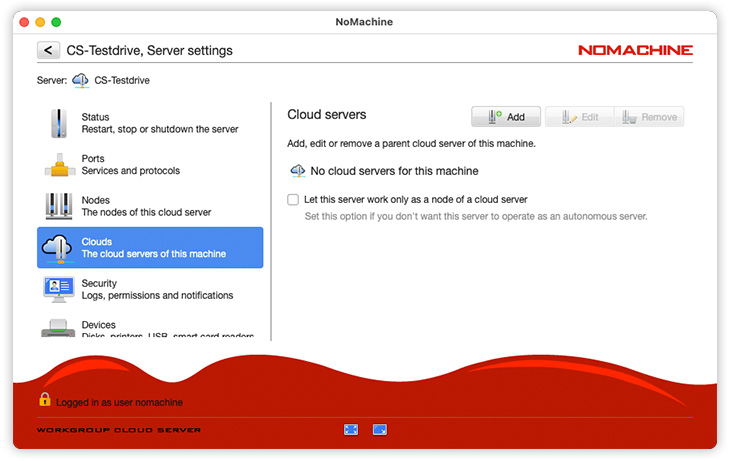
and also add/remove the parent cloud server(s), since whichever cloud server products can be also a node of a NoMachine Enterprise Cloud Server or of a NoMachine Enterprise Cloud Server Cluster, building in this way a multi-level infrastructure:
6.3. Managing Multi-Node Environments via Client UI
With the client UI you can set-up and manage a multinode infrastructure, with the possibility to add, edit and remove nodes at any moment.
Via the client UI you can create a multi-node environment on top of any of the available NoMachine Cloud Server products or you can set-up Enterprise Terminal Nodes of an Enterprise Terminal Server or Enterprise Terminal Server Cluster.
In both cases, it is first necessary to login to the main server as 'root' if the host is macOS or Linux, or as 'administrator' if the host is Windows.
As an alternative, you can use a normal account which has NoMachine administrator privileges. This doesn't affect system privileges for that user.
To make a user become a NoMachine administrator, do the following on the main server host.
On Linux and macOS open a terminal and execute:
$ sudo /etc/NX/nxserver --useredit USERNAME --administrator yesOn Windows open a CMD console as Windows administrator and execute:
> %ALLUSERSPROFILE%\NoMachine\nxserver\nxserver.exe --useredit USERNAME --administrator yesSpecific guides to add nodes via UI are available in the Tutorial section at: https://www.nomachine.com/all-documents .