Configuring the NoMachine connection
To connect to the remote computer, pre-requisite are that any of the NoMachine server products is installed on the remote computer, that you know the IP of that computer and that you have a system account there.
On your device, to create a new connection, open the NoMachine UI and click on the 'Add' button on the top left:

Then complete all the requested fields:

1) Give a meaningful name to your connection.
2) Specify the IP or hostname of the remote computer. If you're in the same network (LAN or VPN) use the internal IP, if you connect over the internet, use the public IP.
3) Provide the port. Connections in the same network use by default port 4000 and NX protocol. If you connect over the internet, use the external port.
Information about IP and port (internal and external) can be retrieved on the remote computer when opening the NoMachine UI. The welcome panel display them, for example in the following image internal IP is 192.168.2.29 (port is default 4000) and external IP is 151.1.192.128 and the correspondent external port is 29382:

If the server on the remote computer supports that, in panel Add connection -> Address you can switch to the SSH protocol. For connections in the same network, it uses by default port 22 when the server is on Linux and macOS and port 4022 when the server is on Windows.
When connecting to the remote computer, you will be requested to authenticate by providing username and password of a valid account on that computer.
You're done!
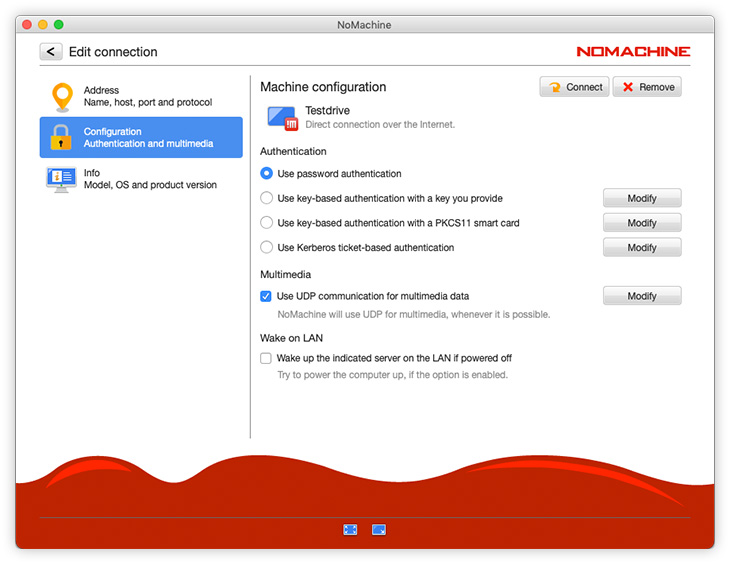
If the server requires a different authentication method, you can set it when configuring the new connection. Choose the Configuration panel on the left, it will apply to the protocol selected in the previous Address panel.
Choose the alternative method and click on the Modify button to enter the settings panel for that method.
By default connections by NX protocol use UDP for multimedia data whenever possible. By disabling it,
all data will be transferred via TCP.
In the Configuration panel you can also enable the Wake on LAN feature to power the remote computer on.