


Quick Guide to the NoMachine User Interface
Table of Contents
Introduction
1. What is the NoMachine User Interface?
NoMachine Player
2. How to access NoMachine Player Settings
NoMachine Server
Introduction
1. What is the NoMachine User Interface?
This guide is an introduction to the NoMachine User Interface (UI) in NoMachine software version 8 or higher. It is intended to illustrate the settings that can be configured in order to tune access from and to the remote computer on which it is installed.
The UI is essentially divided into three components:
- Player. This is available when installing all of the NoMachine packages including Enterprise Client. It controls the connecting client-side preferences.
- Server. The Server is present when installing any of the NoMachine packages (free version and 'Server' products), but not the Enterprise Client. It manages the services of the host on which it is installed.
For guidance on installation and how to start a session to the remote computer, please consult the Tutorials & Installation & Guides available in the Support Section of the website: https://www.nomachine.com/all-documents. There is also a Guide to the Server side UI for more advanced users which provides in-depth details on its configuration:
- Remote server administration. The server remote administration's UI allows to administer a server from remote, without the need to be physically on that server host or connected via NoMachine session.
NoMachine Player
2. How to access NoMachine Player Settings
NoMachine Player provides the connection interface with which users initiate the connection to the remote computer that they want to access, and it also allows you to:
- configure the language to be used and appearance of the UI and connection menu
- set the paths to be used for program files, transferred files and Player settings in general
- organize Player log files and local privacy configuration.
The Player UI is accessible either from the system's Programs/Applications menu, or via any connection shortcut that you have on your desktop. By opening up the UI, select 'Settings':

Clicking on 'Settings' open the panel to choose what to configure. Select 'Player' on the left to list all the possibilites:

2.1. Input
This panel lets you fine-tune keyboard input, mouse and pointer activity, as well as menu appearance to your own requirements:

Always show remote cursor pointer
Check to 'Always show remote cursor pointer' of the remote computer when connecting via a shadowing session, i.e., if you are sharing the desktop session of another user and both of you are connected, the connecting user will see the owner's cursor as well as their own. Disabled by default.
Emulate middle mouse button
Users can enable 'Emulate middle mouse button' to use left + right click in place of middle-button on mouse during the remote session.
Emulate right mouse button
Users connecting from Mac can enable 'Emulate right mouse button' to use Ctrl + mouse click in place of right-button on mouse during the remote session.
Grab the keyboard input
Enable sending of local key presses to the remote window, such as Alt-Tab and PrintScreen. Sending Alt-Tab key events will switch between different remote windows rather than switching among the local windows open locally.
Grab the mouse input
Enable to keep the pointer/mouse always within the NoMachine remote window.
Use hot-key for menu access
Check to use hot-key menu access and personalize the keys to be used by setting shortcut preferences in 'Shortcuts'. Set to Ctrl-Atl-0 (zero) by default.
Use page peel for menu access
Disable or enable 'Page-peel' and choose a corner that won't interfere with your browser or file commands (top right, bottom right, bottom left, or top left). Hovering over the corner to display a page curl effect will quickly pull up the Menu when clicked.
Use action icons in the page-peel
Show action icons 'Minimize', 'Fit-to-window' and 'Fullscreen' in the page-peel space.
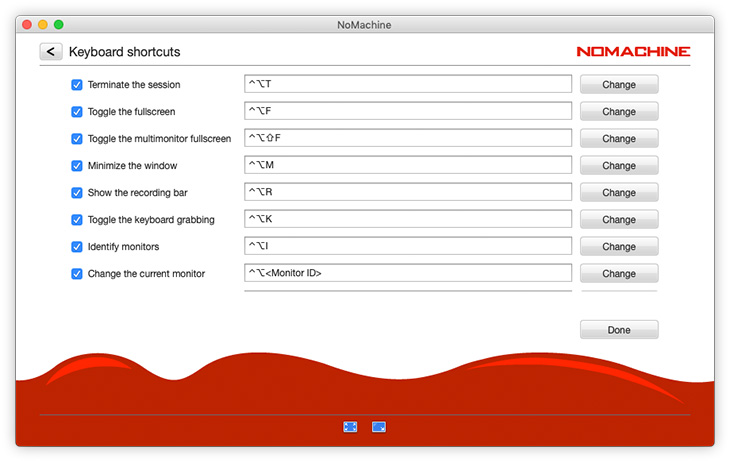
Use keyboard shortcuts for quick actions
Set the shortcuts to be used within the NoMachine session that will allow you to terminate the session, toggle the fullscreen, minimize, show the recording bar, and others:
2.2. Appearance
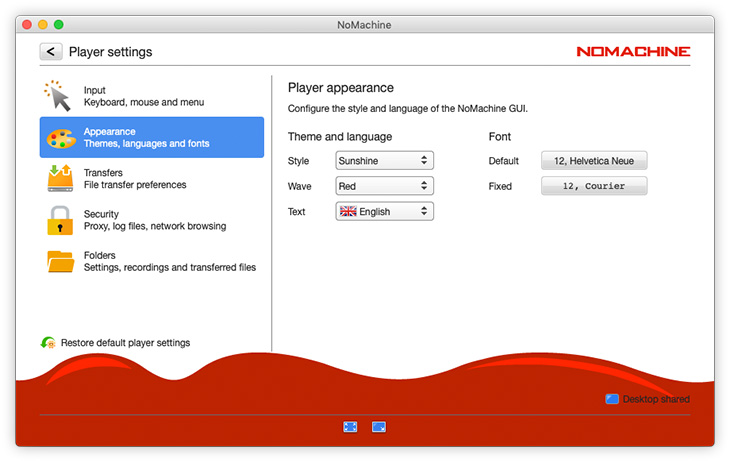
Style
For a native look and feel, select Sunshine. The NoMachine UI will then integrate as a native app on your operating system. For a black UI, select 'Moonlight'.
Wave
Choose among displaying the red wave or the light gray one or the dark gray one.
Text
Select the preferred language to be used in the UI and dialogs. Note: some dialogs such as eventual error messages may be shown in the language of the Operating System.
Font
Select the preferred font. 'Fixed' refers to the font used by the Player should it have to show log excerpts. 'Default' refers to the character style adopted within the UI.
2.3. Transfers
This is where you set whether other users are allowed to send you files from a remote computer, plus any limits on size of the files that you can receive:
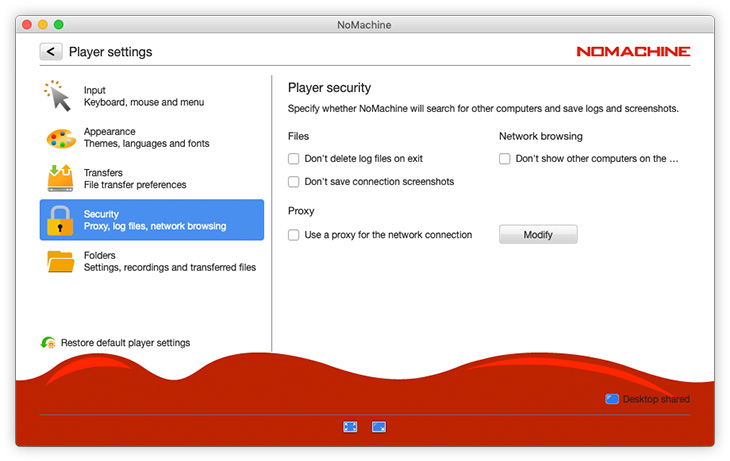
2.4. Security
Configure whether NoMachine should store log files, screenshots and whether other users (on LAN) should be shown in the Machines panel. By default, network browsing box is not checked.
Don't delete log files on exit - Select this to keep log files when closing the session.
Don't save connection screenshots - When disconnecting, NoMachine will save an image of your remote desktop and show it in the connection dialog when you next connect. Check the box to not show a screenshot of the session.
Don't show other computers on the local network - Select this option to not see other computers connected on the LAN which have NoMachine installed.
Use a proxy for the network connection - Disabled by default, check this box if your internet connection passes through an HTTP or SOCKS proxy.
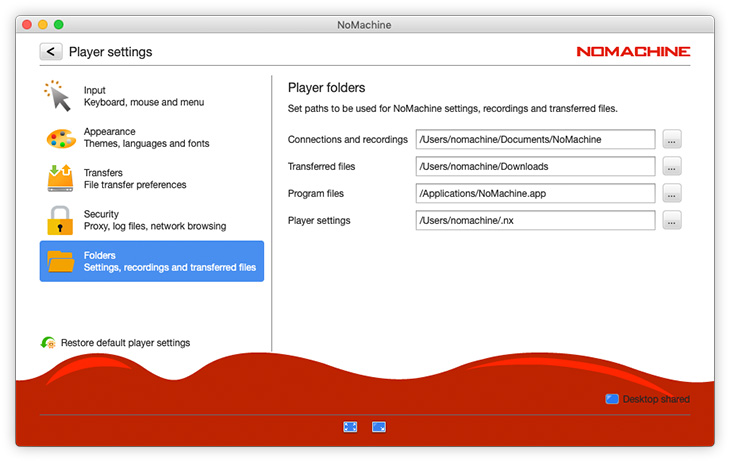
2.5. Folders
Configure the paths for NoMachine program files and connection settings. Indicate where you would like NoMachine to store transferred files and recordings.
NoMachine Server
3. How to access the NoMachine Server Settings
Provided you have installed any of the NoMachine server products, the Server settings are accessible from the Machines panel. The Server settings handle what happens when users connect to the computer on which it is installed. Open NoMachine from the system's Programs/Applications menu, via any connection shortcut that you have on your desktop or via the NoMachine !M in the system tray.
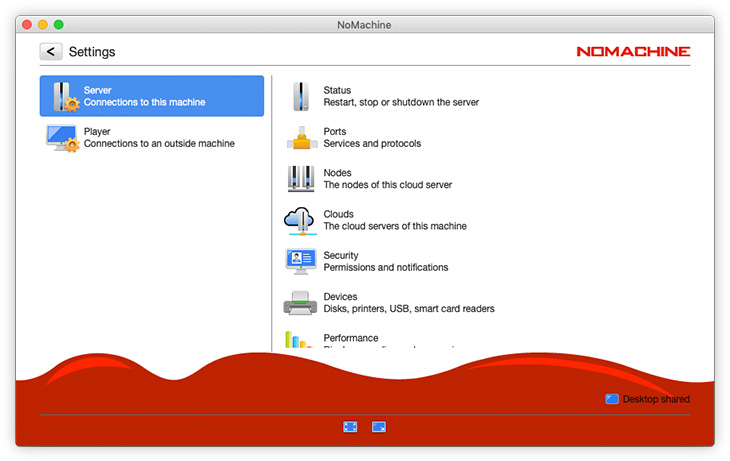
Upon opening up the UI, make sure you are on the Machines panel and click 'Settings':
Then select 'Server':
If the server is not the free version, an item named 'Clouds' is present. That's because a server (not the free one) can be added as a node to any of the products of the cloud server family. From the 'Clouds' panel, you can interact with the cloud server being the parent of this server.
When the server is a Cloud Server, also the 'Nodes' item is present. In the Nodes panel, if you're a system administrator or a NoMachine administrator, you can administer all the NoMachine servers being part of this Cloud Server multinode environment.
You can also access the Server Status, and then all the other Settings panels, from the NoMachine monitor in the system tray:

3.1. Status
Server status
Indicates what IP address to use in order to connect to this computer.
Shows the current status of NoMachine server. You can restart, stop or shutdown the server. When choosing to shutdown the server you will be requested if the server has to be automatically restarted when rebooting.

Scroll down to see all the other information:
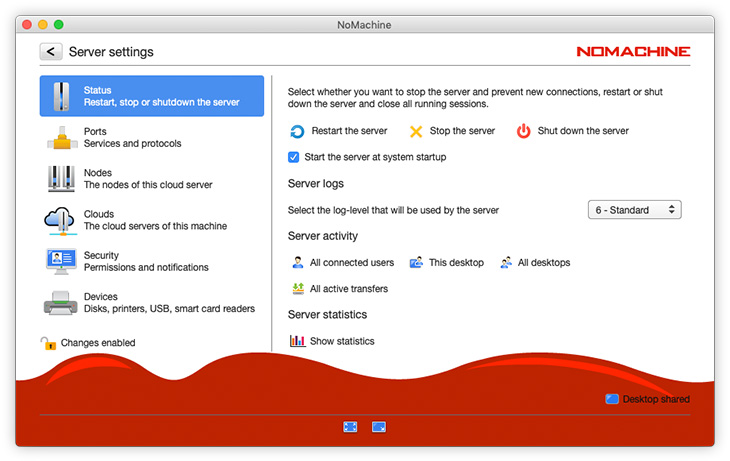
Server logs
You can set here the log level for the server, default is 6- Standard.
Scroll down to see Server activity section:
All connected users
All users connected to this server, also those who are not yet connected to a desktop.
This desktop
Users already connected to the desktop from which you opened this Server Status panel.
All active transfers
All file transfer operations made from users wonnected to the desktop from which you opened this Server Status panel.
Server statistics
3.2. Ports
Lists all the services in use and on what port the service is listening:

Advertise this computer on the local network
Enabled by default. Enable in order for the computer to show up in other users' connection lists when on LAN. Other users will see this computer provided they have not checked the box 'Don't show other computers on the network' (fig. 6). Disabling will stop the broadcast of computer's availability on LAN.
To start/stop/restart a service, modify its port, enabling the automatic port mapping in the router (UPnP) and select the start mode (automatically or manually), highlight the service and click 'Configure' to access the its configuration panel.

Start mode
By default it's 'Automatic', the service will automatically start at every computer boot.
3.3. Clouds
This panel is available for all server types, except NoMachine free which cannot be part of a Cloud Server multinode environment. From this panel you can add, manage and remove this server to a Cloud Server:

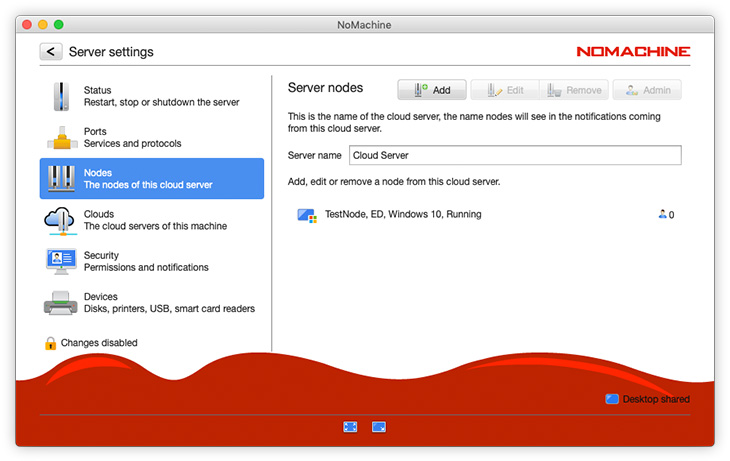
3.4. Nodes
The Nodes panel is available only if this server is a Cloud Server. It allows to add servers as nodes of this Cloud Server, manage and remove them:
3.5. Security
In Security you can enable/disable guest desktop sharing access and configure how you (and other users) can access and interact with your remote desktop.
Settings for the physical desktop of a Cloud Server or an Enterprise Terminal Server apply only to that server, to modify settings for a node it's necessary to open the UI on that node.
It's possible to disallow connections to the physical desktop in all products except NoMachine free and tje Entrprise Deskop.
A substantial difference between terminal servers like the Workstation and the other server types is that terminal servers have also a section to configure behaviour for virtual desktops.
Images in this section are mainly from the UI of the Enterprise Desktop, which is suitable also for the free edition. It will be reported when the image is from another product.
Server security
Allow guest desktop sharing access on this server
Enable this option to allow other users to connect to this desktop upon your approval. Guest Desktop Sharing users don't need to have an account (username and password).
Desktop Access
Only allow users connections for desktop sharing
Use this option when you want to explicitly accept or deny the incoming user's request for access.
Make access available when the system is still in the login screen
When enabled, users can connect to the login screen i.e. when nobody is already logged.
Don't allow the owner of the desktop to connect if the desktop is not shared
This option is related to the Desktop shared/not shared setting.

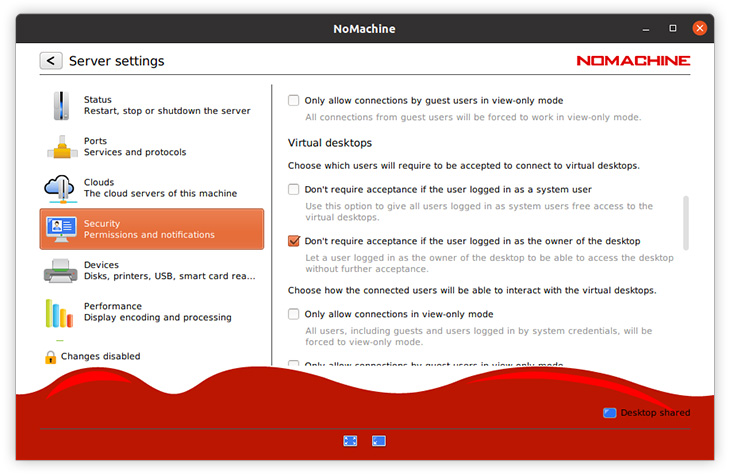
Scroll down, next section is about User acceptance for desktop sharing, which by default requires that the user's request for access is always approved by the desktop owner, when different. Note that in some products Label 'User acceptance' may be not present in the UI.
Don't require acceptance if the user logged in as system user
Diabled by default. By checking the box, users with a valid account on this host can connect without the need of the desktop owner's approval. This configuration is suitable for unattended computers.
Don't require acceptance if the user logged in as the owner of the desktop
Enabled by default. If someone is trying to connect to your desktop, a pop up message asking for your permission appears. By default such authorization is not requested if the connecting user is also the desktop owner, or if he/she is a system administrator or a NoMachine administrator or trusted user. If the computer is unattended, this option should be turned off.
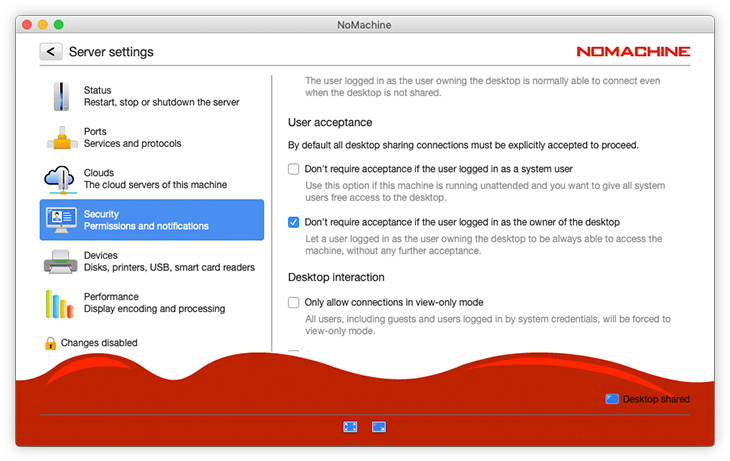
Scroll down to see section about Desktop interaction
Only allow connections in view-only mode
Disabled by default. Checking the box means that all users (either guests or users with a valid account) will connect in view only mode and will not control keyboard and mouse.
Only allow connections by guest users in view-only mode
Disabled by default. Checking the box means that guest users will connect in view only mode. Users with a valid account will connect instead in interactive mode.
Scroll down, terminal servers products for Linux like the Workstation or the Terminal Server have an additional section to configure Virtual desktops. They mirror settings for connections to the physical desktop. Cloud servers, Enterprise Desktop and NoMachine free don't have it.
Don't require acceptance if the user logged in as a system user
Users with a valid account can connect to NoMachine virtual desktops without the need of desktop owner's approval.
Don't require acceptance if the user logged in as the owner of the desktop
Enabled by default.The owner of the virtual desktop can connect to any of his/her virtual desktops already running without the need of owner's approval.
Only allow connections in view only mode
Disabled by default. By selecting this option, all users included guests will connect to a virtual desktop in view-onChecking the box means that all users (either guests or users with a valid account) will connect in view only mode and will not control keyboard and mouse.
Only allow connections by guest users in view only mode
Disabled by default. Checking the box means that guest users will connect in view only mode. Users with a valid account will connect instead in interactive mode.
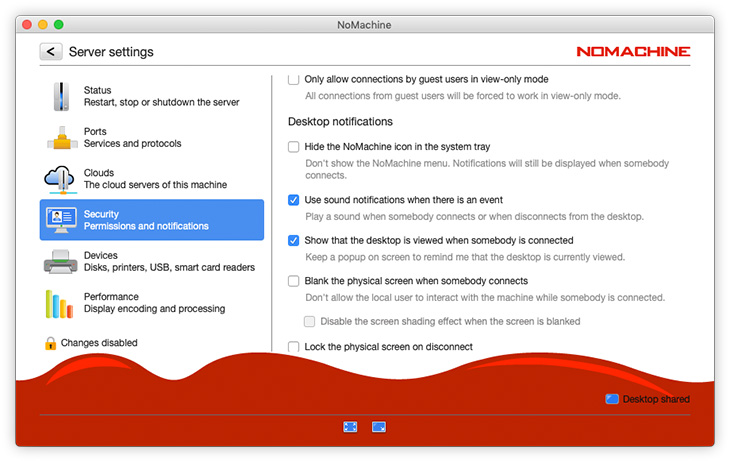
Scroll down to see the Desktop notifications section.
Hide the NoMachine icon in the system tray
By selecting this option, the !M menu in the system tray is no longer displayed.
Use sound notifications when there is an event
Enabled by default. If a user connects or requests to connect to the desktop, or a user disconnects, a sound will be emitted.
Show desktop is viewed info when somebody is connected
Enabled by default. Display a pop-up to remind you that a user is connected and can see all activities made on your desktop.
The following two options apply only to physical desktops:
Blank the physical screen when somebody connects
Disabled by default. Check the box to enable screen blanking and block mouse and keyboard input. Useful for unattended remote computers to p event others from entering data or viewing the monitor while you are remotely accessing it.
Lock the physical screen on disconnect
Disabled by default. This option can be used in conjuction with the screen blanking: even when the last user didn't lock the screen before disconnecting by NoMachine, as soon as the screen is unblanked the system lock screen will be activated automatically to keep the remote desktop protected even if the computer is running unattended. Useful for unattended remote computers to prevent others from entering data or viewing the monitor while you are remotely accessing it.
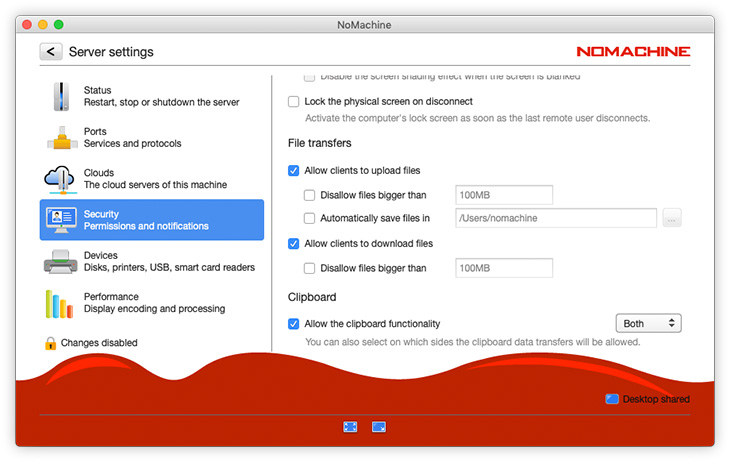
Scroll down to see the File transfers section:
Configure whether connecting clients are allowed to upload and download files from the computer, set any size limitations and specify the location where files must be saved. Connecting client must have the 'Allow others to send you a file' box checked.
Allow clients to upload files - enabled by default, it ensures that others connecting to this computer can send files to the server.
Allow clients to download files - enabled by default, it allows users connected to this computer to download files from the server.
and the Clipboard section:
Allow the clipboard functionality - allow or forbid copy and paste operations from local to remote and/or vice-versa. You can decide on which side the it's allowed to transfer data.
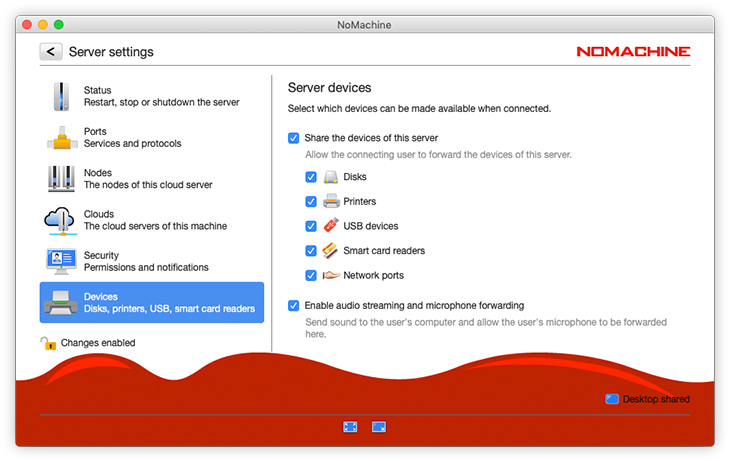
3.6. Devices
Choose to allow specific devices (printers, scanners, disks and more) to be shared to the connecting client, including audio and microphone, useful when VOIP application is being used:
3.7. Performance
In the majority of cases, it won't be necessary to interfere with these settings since NoMachine will carry out the necessary checks and optimizations to give the best possible performance.
By default NoMachine uses H.264 hardware encoding/decoding if both server and client host have an adequate GPU. Otherwise it uses H.264 software encoding/decoding by means of H.264 codec libraries included in the NoMachine package. To use another codec like VP8 or MJPEG, select it in the server settings.
Use a specific display encoding
Configure a specific type of encoding (server side), choosing from H.264, VP8 and MJPEG.
There are some cases where MJPEG might be more suitable such as when accessing a less powerful computer (legacy PC or computer with reduced CPU and RAM specifications). Selecting MJPEG will consume more bandwidth.
Use hardware encoding
Enabled by default, use H.264 HW encoding when the graphic card supports it and hardware decoding is available on client side.
Use a specific frame rate
Select the frames-per-second that you prefer. Higher is recommended for activity such as game-playing.
Use acceleration for display processing
Applicable to Windows only with support for DirectX (OpenGL on Mac and Linux coming soon). If enabled the remote Windows server/host being accessed will capture the screen content using DirectX.

3.8. Updates
Here you will find information about the product installed and the license validity (if applicable). Additionally, enable automatic software updates. Leave unchecked if you prefer to do it manually. Updates are set by default to check NoMachine respositories every 2 days. You can override this by clicking 'Check now'.

Scroll down to access the License information section.
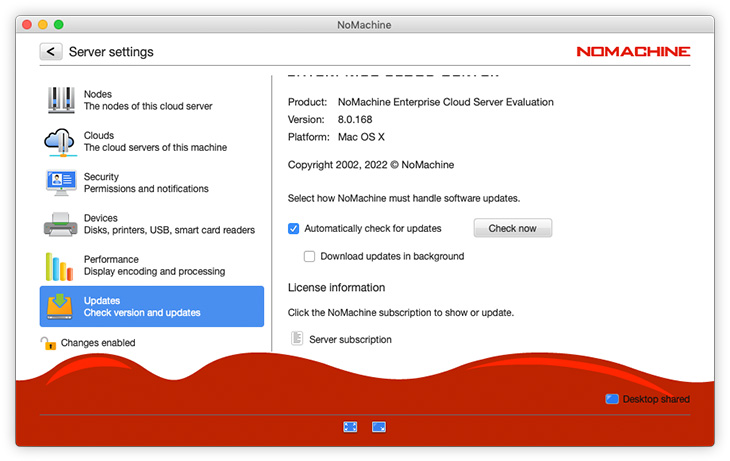
Click on 'Server subscription' and/or 'Node subscription' to display the license file and in case replace it with a new one (click on the Replace button to upload and activate it).

3.9. Appendix - Desktop Shared/Not Shared
At the bottom of the UI,when there is a server installed, there is a small icon which controls fast track access to the desktop sharing functionality. When 'Desktop shared' is selected connections to that desktop are on.
When 'Desktop not shared' is selected, it's not possible to connect to that desktop:

If the computer is your own and you need to access it remotely, you can still connect even when the desktop is not shared, if your user is also the owner of the remote desktop.